Coder Social home page Coder Social logo

blog's Introduction

blog's People

Contributors

ahmedk92 avatar

Stargazers

 avatar  avatar  avatar  avatar  avatar  avatar  avatar  avatar  avatar  avatar  avatar  avatar  avatar  avatar  avatar  avatar  avatar  avatar

Watchers

 avatar  avatar  avatar  avatar  avatar  avatar  avatar

blog's Issues

Arabic As A Default Language for Your iOS App

(Originally published 2018-08-10)

This was originally an answer I wrote in our local iOS Developers in Egypt Facebook group.


Sometimes you want to make an Arabic-only app. Or you may want to support some languages, but you want Arabic to be the default app language. Here we see how it's done, as it's not intuitive to figure out.

Scenario 1: The app's single language is Arabic

You may be tempted to layout your views directly in Xcode's Interface Builder exactly as your design guide suggests. For example, if your design is like the image below, you may decide to put the button on the leading side, and the textfield on the trailing side.

design

The problem with this approach is that iOS will consider this to be how you want your app to look in Left-to-Right mode. That is, back buttons in the navigation bar stil will be by default on the left, alongside the navigation controller's back swipe gesture.

So, the better option is to implement it as if your project is localized. That is, Put the textfield on the leading side, and the button on the trailing side. But you may ask, what will flip our views to give us our desired outcome?

Answer: CFBundleDevelopmentRegion

  1. Open your project's info.plist as source code (Right-click -> open as source code).
  2. Look for CFBundleDevelopmentRegion. You'll probably find it something like $(DEVELOPMENT_LANGUAGE). Change that to ar.

That's it. Run your project and enjoy your flipped interface.

However, I don't like this approach. As it may leave your project with a somewhat nonesensical project configuration. I mean, if you open your project settings (not target settings), you'll find these configurations in the Localization section:

localizationsettings

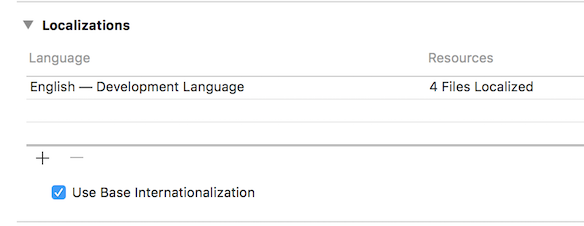
It says English is the development language, while it's really not the case. While you can remove it, and add Arabic, you dont' get the - Development Language part infront of it. Also, Xcode will generate Arabic localization files for your storyboars which you probably don't need.

I prefer the following approach albeit a bit hacky.

Steps:

  1. Navigate to your project.xcodeproj.
  2. Right-click and choose Show Package Contents.
  3. Open project.pbxproj with a text editor.
  4. โŒ˜ + F and look for the word region. You should find two matches, developmentRegion and knownRegions. Change the en in their values to ar, like the image below.

regions

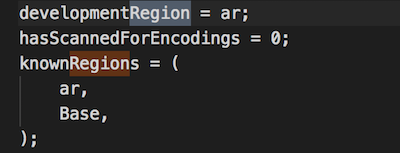
That's it. You get Arabic as the development language.

localizationsettingsar


Scenario 2: Arabic as first language in a localized app

Your app is already localized. You support multiple languages. But you want the first run of your app to be in Arabic, and the user can change that later. What to do?

Before we begin, it's better to know how iOS choose the right language for our app. It's explained here in this official Q&A, but I'll write the gist of it.

iOS selects the first language in the user's language preferences list (in General > Language & Region of the Settings application). Then looks in your project for a matching .lproj folder. Such folder contains the relevant .strings files for the localized resource (e.g. Storyboard). Every language you support has a .lproj folder with the language prefix, e.g. ar.lproj, en.lproj, ...etc. So, on app start, iOS selects the localization that it sees correct, and doesn't refer to you (the developer) for such decision.

That is for apps supporting languages in the user's language preferences list. If the user's language preferences list doesn't match any .lproj folders in your app, iOS uses the CFBundleDevelopmentRegion. And that's basically how things work in Scenario 1 above.

So, our task here is to bypass that preferences list check. Fortunately, iOS seems to store a copy of such preferences list in each app's user defaults. So if you want tp retrieve it in run-time, you can query it like this:

NSUserDefaults* defs = [NSUserDefaults standardUserDefaults];
NSArray* languages = [defs objectForKey:@"AppleLanguages"];
NSString* preferredLang = [languages objectAtIndex:0];
NSLog(@"Current language is %@", preferredLang);

This is a code snippet from Apple Samples on Localization.

Fortunately, this user defaults entry is writable. So, we can replace that preferences list with one of our own. An array of language identifiers where Arabic is the first is enough for Arabic to be the default, e.g. ["ar"].

So far so good. Now the question left is where to set that new array?

application:didFinishLaunchingWithOptions: is not early enough to set such key. The true starting point of any iOS app is a function called main. It may be unkown to Swift iOS developers, but it's well-known for those who worked with Objective-C.

In Objective-C projects, you can easily find it in a file called main.m. It looks like this:

Objective-C:

#import <UIKit/UIKit.h>
#import "AppDelegate.h"

int main(int argc, char * argv[]) {
    @autoreleasepool {
        return UIApplicationMain(argc, argv, nil, NSStringFromClass([AppDelegate class]));
    }
}

In Swift projects, it's a bit weird. As described in Hacking with Swift, you need to delete @UIApplicationMain from your AppDelegate class, then add a file exactly named main.swift. For our purpose, the main.swift file will look like this:

class MyApplication: UIApplication {
    override init() {
        let notFirstOpenKey = "notFirstOpen"
        let notFirstOpen = UserDefaults.standard.bool(forKey: notFirstOpenKey)
        if notFirstOpen == false {
            UserDefaults.standard.set(["ar"], forKey: "AppleLanguages")
            UserDefaults.standard.set(true, forKey: notFirstOpenKey)
        }
        super.init()
    }
}

UIApplicationMain(
    CommandLine.argc,
    CommandLine.unsafeArgv, 
    NSStringFromClass(MyApplication.self),
    NSStringFromClass(AppDelegate.self)
)

The bottom part, UIApplicationMain, is explained in the Hacking with Swift article above. What's relevant to us here is the implementation of the MyApplication subclass.

As you may be already understanding by now, MyApplication is our custom class implementation of UIApplication. So, its init method can be regarded as the very inception of our app; the first milliseconds of our app's life. Here we can set the AppleLanguages key, and make use of its effect.

In the code snippet above, I do an additional check to see if we've done this before; to avoid unwanted repitition.

That's it. We're done. It's finally over.

References

Changing default development language

Acheiving Dynamic Localisation in iOS

(Originally published 2017-12-15)

While you can make your app support multiple languages, still there's no easy (and documented) way to dynamically change the app's localisation. You either let the user choose the iOS device's language; and your app just follows along. Or you can use that AppleLanguages solution. But if you want the change somewhere after the app has started (i.e. not in the main function), you have to close the app, and wait for the user to open it again. Which is not the best we can expect.

Alternatives

There are many libraries (on cocoapods for example) that enables you to acheive that without closing the app. But they just work on strings; either an NSLocalizedString replacement, or overriding its behaviour. Which is good, but unfortunately ignore flipping views on RTL languages like Arabic.

What worked for me

To organize, we have two problems: (1) flipping views based on the chosen language direction preference. (2) Guiding NSLocalizedString to use the correct strings.

(1) Flipping views

Since iOS 9, there's this property that enables you to decide, for a view, whether it should be always displayed left-to-right, or right-to-left (despite whatever is the language), or it should follow the language. The property is semanticContentAttribute.

Now, the question is when to set that property to take its effect? and how? Usually, UI is diversely created; maybe from storyboards, XIBs, or code. So, an early point of initialization is a good time; e.g. initWithCoder: (for views designed in Interface Builder) or iniWithFrame (for views created by code). awakeFromNib is a good time too for views designed in Interface Builder. OK, but how would we override those methods? Swizzling to the rescue.

Through swizzling, we can check the language in awakeFromNib for example, and set the relevant semanticContentAttribute. Good!, but there may be a little caveat. There may be some views that are required to be always left-to-right or righ-to-left all the time; we don't want to mess them up. We can avoid that by a simple check; we only apply the semanticContentAttribute to views with an .unspecified value.

So far so good. But what about currently visible views? what can we do about them? One can think of making every visible view observe the language change (via NSNotificationCenter for example), then try to force a redraw. But I don't like this approach, and I prefer to simply restart the flow of my app. That is re-assigning the window's root view controller with a new one, and start over the app's flow. Something like this:

for view in UIApplication.shared.window.rootViewController.view.subviews {
    view.removeFromSuperView()
}
UIApplication.shared.window.rootViewController = UIApplication.shared.window.rootViewController.storyBoard.instantiateInitialViewController 

That's it. And it works nicely.

(2) NSLocalizedString

As mentioned above, there are many libraries that do this. Most of them offer a replacement for NSLocalizedString. But sometimes, the dynamic localiztation feature is required so late in the project life-time that NSLocalizedString is scattered all over the project. So, overriding its behavior would be better. I heard about a library that does this, but couldn't find it ๐Ÿ˜‘. However, that overriding is not hard.

I built my solution on this StackOverflow answer. The whole discussion is useful. The idea is that NSLocalizedString is just a macro that uses localizedStringForKey:value:table: method of the NSBundle class; specifically on [NSBundle mainBundle] instance. So, swizzling is again used here. In short, the [NSBundle mainBundle] instance's implementation is replaced by an NSBundle subclass that, on language change, makes the [NSBundle mainBundle] return a new bundle that is relevant to the selected language. Easy, but tricky.

That's it.

Notes

  • Maybe it won't be enough to just have the views flipped; you may want text views (e.g. UILabel, UITextField) to flip the text alignment too. That's acheivable in our same awakeFromNib implementation explained above. All you need is checking wether the current view is a UILabel, then repeat the same logic; check wether the text alignment (NSTextAlignment) is set to .natural, then set to the correct alignment (i.e. .left, or .right).

Working on weekends

I used to work on weekends. I was aware of advice against this. However, I thought online writings were too focused on work-life balance (which hasn't been much of an issue for me, until recently) that I overlooked other downsides that I consider serious now. Examples:

  1. Pressure on colleagues
  2. Normalizing inefficient work week
  3. Setting unrealistic expectations for myself

Pressure on colleagues

If I work on weekends, it will show up one way or another. Be it a notification when I push something to git, or logged timestamps somewhere. Sometimes colleagues know about this either instantly (on weekends) or it's obvious to see when they return. This puts unwanted pressure on them. Some may feel pressured to show more urgency or dedication. This is exacerbated whenever there is a tight deadline or some firefighting. I don't want to inadvertently give the wrong impression that I do or do want to look like I care more about work than others.

Normalizing inefficient work week

Even if there is not a compelling reason to think of working on weekends, I sometimes did it anyway. One reason was that I didn't do a good job finishing my tasks during the work week, in the first place. I remember a time when that became a habit. I always relied on weekends to finish left over work. I think I'm lucky I was forced to stop this when family responsibilities started to grow and take more of my weekend time. I now, thankfully, have more discipline and less distractions during my work week.

Setting unrealistic expectations for myself

Even if I made the most out of the work week, I used to work on weekends because I thought I didn't have something better to do, was in the "flow", or was too curious about the problem at hand. Although I haven't been given feedback on this, but I feel this would set inaccurate, unrealistic, and unfair expectations of my normal productivity. Once, for any reason, I work like a normal person, I would then look like I'm under performing.

Experimenting With targetContentOffset: Part 1: Uneven Pagination

(Originally published 2019-01-19)

Introduction

There are at least three ways of paginating content in iOS. Namely, via UIScrollView, UIPageViewController, and UICollectionView.

For simplicity, I'll consider only horizontal pagination from now on in this post.

UIPageViewController paginates its contents by setting its transitionStyle property to .scroll. UIScrollView and UICollectionView paginate their content by setting their isPagingEnabled property to true.

It's worth noting that all these solutions are essentially built upon UIScrollView. UIPageViewController uses a special UIScrollView subclass (private API I think) called _UIQueuingScrollView. UICollectionView is a UIScrollView subclass.

Limitations

1. Page Size is Fixed

A common trait among the previous solutions is the fixed page size. That is, the amount by which content is paged is always equal to the scrollView frame. If you want to have a page size different from the visible "frame", you have to seek workarounds; e.g. this clever solutions [1, 2] by Khanlou, or my solution using a UICollectionView here.

2. Uneven Page Size

Another limitation is if you want more than a page size in a single flow. For example, when your flow can be considered a series of pairs, where each pair of pages are separated by a constant spacing, while each item of each pair is separated by a different amount of spacing. I think this is impossible to work around with the above solutions.

uneven1

uneven2

One can think of having more than one level of pagination to fix this. For example:

  1. A UIPageViewController for the pairs, while each pair is a UIpageViewController itself.
  2. A UICollectionView for the pairs, while each pair is a UICollectionView itself.
  3. Similar thing with raw UIScrollView.

However, these solutions have problems.

  1. For the nested UIPageViewController it's so easy to swipe an entire pair while not noticing. This is because the outer and the inner UIPageViewControllers have contentSize greater than the visible frame (since UIPageViewController always loads 3 pages if possible (left, center, right)). So, any pan gesture can both affect any of them.

  2. Similar thing can happen too with nested UICollectionViews. However, it can be worked around by disabling prefetching on the outer UICollectionView. This way, the outer UICollectionView only loads one cell (pair cell), while the pair cell can load its full content; so the pan gesture would work fine with inner UICollectionView as expected. However, on fast scrolling, this seems to not work; and pairs are again skipped.

scrollViewWillEndDragging(_:withVelocity:targetContentOffset:) has something to say

UIScrollViewDelegate has this interesting method that is called when the user ends dragging. It reports the velocity by which the user did their swipe, and (which is our focus) passes the expected content offset at which the scrollView would stop! So clever! And there's more to it. It's possible to change that expected offset so the scrollView smoothly stops at a desired position!

So, knowing this, we can "snap" the decelerating scrollView to a position of our choice, so there is a chance to solve our uneven page size problem.

Idea

(Using a UICollectionView of pairs, where each cell is a pair of UIView subclass)

Given an item width equal to the visible frame. Each pair of items are separated by 50 pts of space on each side. We can:

  1. We can partition of content into a series of evenly sized pairs (including spacing). That is, each pair width = item width * 2 + spacing (25 pts at each side).

  2. When scrollViewWillEndDragging is called, we can inspect the targetContentOffset and see at what index of pairs that offset value should correspond. Such index can be achieved by dividing (integer division) the value of the targetContentOffset by the pair width.

  3. Note that targetContentOffset always points to the leftmost of the screen. This causes a bias to the left side of scrolling, so that way, integer division would be inclined to get lesser indices; 1 is more likely to come than 2, 2 is more likely to come than 3, and so on... One way to overcome this is to offset the targetContentOffset a little to balance this bias; making it points to the middle of the screen rather than it leftmost edge. To achieve this, just add half of the visible frame width to the targetContentOffset before integer division.

  4. Now we have a correct index of a pair. We only have to decide which part of the pair we want to snap to. So, the sizes of each part of the pair should be known to us. That way we can decide which part is close to the adjusted targetContentOffset calculated above (adjusted to the middle of visible frame). And that's it. Now finally alter the value targetContentOffset to achieve our desired effect, e.g.: targetContentOffset.pointee.x = rightItemX.

Notes:

  1. We don't use isPagingEnabled here; we use normal scrolling. The default decelaration rate may be too slow; so setting the UICollectionView's decelerationRate to .fast should do it.

  2. We have to inset the UICollectionView by half the spacing at each side to achieve contentSize multiple to that of pair width.

  3. Large swipes may cause jumping over a page. This avoidable by clamping the amount by which the targetContentOffset changes. It may also appear as a feature not a defect. ๐Ÿ˜„

  4. Very weak swipes that are not enough to make a page change caused a choppy animation. I mitigated this by detecting it (non-zero velcoity, same targetContentOffset) then setting the content offset with an animation.

Conclusion

Here is a demo in Swift that implements what's above.

Although the solution presented here may not be perfect, it's the best I could come up with. It's a tricky problem that I hadn't find a complete solution for it so far.

For questions, and suggestions please contact me via Twitter, or submit a pull request on the linked Github demo.

Thanks for reading!

Your Guide to iOS Dev Twitter

(Originally published 2019-02-01)

Here I should be listing (and categorizing) the most useful iOS Developer Twitter accounts to follow.

Last week, I found myself taking a colleague in a tour through Twitter accounts and telling him about what accounts to follow if he wants to learn about specific something (about iOS). He responded, "you should share this." So, I write this in hope of someone finding it useful.

This is not an exhaustive list (for sure!); maybe I dropped someone (or more), and of course more creative people are going to rise in the future. Help me make this list age well!

Teachers

Uncategorized

Low-level

Async and Multithreading

Text Rendering

Graphics & Math

Webkit

Swift Team

Swift enthusiasts

Functional Swift

SwiftUI

Design & Code

SwiftUI Animation

Testing && TDD

Tooling & Infrastructure

Subscriptions and In-app Purchases

Reverse engineering & Wizardry

Indie

Rising

Learning Sites

Newsletters

Enabling Optimizations for CocoaPods in Debug Mode

(Originally published 2018-06-15)

Background

Compiler optimizations are disabled by default in Debug mode. This is to enable a sane debug experience by avoiding omitted variables (or even whole blocks of code). Such omissions are often done as a part of the optimization phase in a compiler work.

Problem

Sometimes, we use a dependency (e.g. via CocoaPods) that may perofrm noticebly slower in Debug mode. Since it's a dependency, and as long as it isn't causing problems, we probably are not interested in debugging it. Therefore we can comfortably enable optimizations in Debug mode.

optim

โš ๏ธ Not A Lasting Solution โš ๏ธ

This will get reset after the very first pod install. To overcome this, add a post-install CocoaPods "hook":

post_install do |installer|
      targetsToOptimizeAtDebug = ['SwiftSoup']
      
      installer.pods_project.targets.each do |target|
          if targetsToOptimizeAtDebug.include? target.name
            target.build_configurations.each do |config|
                if config.name == "Debug"
                    config.build_settings['SWIFT_OPTIMIZATION_LEVEL'] = '-Owholemodule'
                end
            end
          end
      end
  end

That's it! โœ…

Now for every relevant pod, you can add it to the array above, and forget.

Clearing Stateful Subjects

Functional reactive programming (FRP) frameworks have a class of subjects that are stateful. That is, they store a value that can be queried, or sent immediately to new subscribers upon subscription. Combine's CurrentValueSubject and RxSwift's BehaviorSubject are good examples.

Sometimes we need to prevent new subscribers from immediately receiving the stored value and instead expect a new value. This is what can be called clearing or resetting the subject. Looking up this problem on the internet yields a solution that involves both the producer and the consumer agreeing on a special value that can be ignored. Luckily, Swift's optional can be leveraged to make this look more brief and tidy.

Usually, to prevent external mutation, subjects are an implementation detail to an exposed publisher/observable (in Combine/RxSwift terminologies). So, we can define our subject to be of Optional<T> where T is our output value type. Then, we use compactMap on the subject to expose the publisher/observable. This way we can send nil values to the subject to replace the current value while being filtered out by compactMap.

Combine Example:

import UIKit
import Combine

class ViewController: UIViewController {

    override func viewDidLoad() {
        super.viewDidLoad()
        
        intProvider.experiment()
        cancellable = intProvider.publisher.sink { int in
            print(int)
        }
    }
    
    private let intProvider = IntProvider()
    private var cancellable: AnyCancellable?
}

class IntProvider {
    var publisher: AnyPublisher<Int, Never> {
        subject
        .compactMap({ $0 })
        .eraseToAnyPublisher()
    }
    func experiment() {
        subject.send(nil)
        DispatchQueue.main.asyncAfter(deadline: .now() + 2) {
            self.subject.send(1)
        }
    }
    private let subject = CurrentValueSubject<Int?, Never>(0)
}

RxSwift Example:

import UIKit
import RxSwift

class ViewController: UIViewController {

    override func viewDidLoad() {
        super.viewDidLoad()

        intProvider.experiment()
        disposable = intProvider.int.subscribe(onNext: { int in
            print(int)
        })
    }
    
    private let intProvider = IntProvider()
    private var disposable: Disposable?
}

class IntProvider {
    var int: Observable<Int> {
        subject.compactMap({ $0 })
    }
    func experiment() {
        subject.onNext(nil)
        DispatchQueue.main.asyncAfter(deadline: .now() + 2) {
            self.subject.onNext(1)
        }
    }
    private let subject = BehaviorSubject<Int?>(value: 0)
}

Both print:

1

not:

0
1

Thoughts on Realm

(Originally published 2019-11-23)

Realm is a popular persistence solution, and I really like it a lot.
Because of its ease of use, many - including me - prefer it over Core Data.
However, it has some surprises and limitations.
Here I discuss some of them.

When Laziness Backfires

Laziness may be the defining feature of Realm.
Performance-wise, Realm saves a lot of execution time by following a lazy approach in retrieving data.
That is, queries are not really evaluated unless the results are accessed.
And data (objects and properties) are not loaded into memory unless accessed, too.
Consider the following code (from the docs):

let dogs = realm.objects(Dog.self) // retrieves all Dogs from the default Realm

That line alone basically does nothing.
Fetching is done when we start to do something with that result; like accessing the count property, or accessing an item at index.

let dogs = realm.objects(Dog.self) // retrieves all Dogs from the default Realm
print(dogs.count) // Here it begins to really evaluate the query.

So, requesting dogs.count evaluates the query. But since no data is really fetched, this executes fast.

Realm optimizes for this pattern of use.
Actually Realm bets on queries being simple, and data being already properly organized and indexed. Consider the following code:

var tanDogs = realm.objects(Dog.self).filter("color = 'tan' AND name BEGINSWITH 'B'")

This is a more complex query. However, it still will be fast whenever we deal with it.
I didn't try a similar query on a very large dataset to confirm speed, but you can figure out how
Realm would optimize retrieving data by following a cursor-like approach, since the expected results will
probably be enumerated (e.g. used in a loop).
So, it doesn't have to scan all the data to start giving you something to work with.
However, consider the following query:

let sortedDogs = realm.objects(Dog.self).filter("color = 'tan' AND name BEGINSWITH 'B'").sorted(byKeyPath: "name")

Here we use the same query from above except we ask Realm to fetch sorted by name.
Depending on the size of data, we can notice a significant slow down.
The culprit is the sorting phase. The reason is sorting requires Realm to scan the whole data in advance to
start giving you something to work with. So, the full cost of the filtering part will be paid.

Now we're starting to make good sense of how Realm works in regard to data retrieval.
The question is, how this can hurt us?

Notice we use a synchronous API when using Realm. We don't bother with asynchrony, callbacks,
threads, etc. We get data in a plain simple way.
And since everything goes as planned, we don't block the UI thread, and everything goes smooth...until we face such query.
Then, problems start, as the docs don't prepare you for such situations (remember, those are "rare" situations). For example, developers will probably start to "fix" this using classic remedies, such as
offloading work to the background. But that only reveals other Realm limitations, like instances not being passable across threads. A very popular issue among Realm users.

Thankfully, helpful strategies are compiled here by JP Simard. Which can summarized as:

  1. Use the async notification API.
  2. Keep the database and objects small.
  3. Think carefully about how data should enter the database in first place.

While all are useful advices to follow (even when not using Realm), notice how we then get far from Realm's
marketed simplicity. So, to utilize Realm best, don't think of it as an object-oriented alternative to a RDBMS. Think of it as persistence companion to viewing your data in lists. That is, save your data in a way it is as ready to be fetched as-is as possible without much querying and post-processing.

Invasive Types

Another inconvenience with Realm is that you can't harness its performance offers unless you make
your code tightly coupled to its types.

Recall that code from above:

var tanDogs = realm.objects(Dog.self).filter("color = 'tan' AND name BEGINSWITH 'B'")

We now know it will run fast as long as we don't force Realm to do the full scan beforehand.
We saw how could we force it by requesting a sort. However, you can force it too by converting the Results
object to a Swift array, as follows:

var tanDogs = realm.objects(Dog.self).filter("color = 'tan' AND name BEGINSWITH 'B'").map({ $0 })

So, you can see how this will affect your design, especially if you're keen on isolating your database
implementation from the rest of your project.

Conclusion

So, if something sounds too good to be true, it probably is.
This is not a rant against Realm (maybe the docs ๐Ÿ˜…), it's a brilliant solution made by brilliant engineers.
However, we developers should deal with any tool with a grain of salt, and understand its limits before its capabilities.

Experimenting With targetContentOffset: Part 2: Custom Pickers

(Originally published 2019-02-03)

This post should be more fun than its predecessor. We're going to make a snappy picker control similar to UIPickerView, utilizing (of course) scrollViewWillEndDragging(_:withVelocity:targetContentOffset:).

I don't intend this to be a tutorial, so this may not be up to your expectations. ๐Ÿ˜…

I also don't intend this to be a library/resuable view. I like this to be a DIY (Do it yourself) guide in which you learn the concept then customize and create as freely as you want.

Final code is here

Enough talk, let's work!

Demo

moodpicker

Idea

As we saw in the previous post, scrollViewWillEndDragging(_:withVelocity:targetContentOffset:) enables us to control at what point the ongoing scrolling animation should stop. I cannot not get excited when I think about this.

So, the idea is to "partition" the available content size of the collection view into chunks where each is of the same width which is a multiple of the total content size. Hence, when scrollViewWillEndDragging(_:withVelocity:targetContentOffset:) gets called, we can check at which partition targetContentOffset lies. This gives us the target index of our item.

Now that we have the target index, we can calculate the content offset (point) that corresponds to that index. Multiplying the index by the width of each cell gives us the left-most point of the cell.

        var targetIndex = targetContentOffset.pointee.x / cellSize.width

Fixing Rounding Bias

I've been talking about calculating an index. An index is an integer value; so how are we rounding that result of dividing targetContentOffset by the cell size? To elaborate, the targetContentOffset can be something like 199 while the cell size may be 50; so the division operation would result in 3.98. What value are going to choose? 3 or 4?

I don't know the perfect rounding strategy here, but I suggest rounding with respect to the scrolling direction. That is, if we're scrolling right, we round up, and round down if we're scrolling left. We can know the scrolling direction via the velocity parameter in scrollViewWillEndDragging(_:withVelocity:targetContentOffset:); left is velocity < 0, right is velocity > 0.

        targetIndex = velocity.x > 0 ? ceil(targetIndex) : floor(targetIndex)

This will run fine in most cases. However, we'll get a not so pleasant result when the velocity is exactly zero. That's if we consider a velocity of zero is either left or right, we can notice that "slow" scrolling is biased towards that direction. What I mean by slow scrolling is when your scrolling gesture is more of a slow pan rather than a quick swipe; something similar to the slide to answer gesture.

One solution to this problem is to add half the width of the cell to the targetContentOffset before division. I went with that and works fine with one caveat. When scrolling to the last item, this way of rounding results in an index value greater than the last valid item index by one. I work around this by clamping the resulting index.

        var targetIndex = (targetContentOffset.pointee.x + cellSize.width / 2) / cellSize.width
        targetIndex = velocity.x > 0 ? ceil(targetIndex) : floor(targetIndex)
        targetIndex = targetIndex.clamped(minValue: 0, maxValue: CGFloat(emojis.count - 1))
        targetContentOffset.pointee.x = targetIndex * cellSize.width
        
        index = Int(targetIndex)

Insets

If we implement till this point, we'll find that there are a couple of cells at the left side that we can't center. This is because they're logically at the correct content offset (i.e. The first should be at zero). So, what we need to change here the edge insets of our collection view. We need to inset horizontally with enough amount that the left-most cell is centered (screen-wise), and similarly for the right-most, while maintaining correct content offsets.

The needed inset amount is equal to half the width of the screen minus half the width of the cell.

    override func viewDidLayoutSubviews() {
        spacing = collectionView.bounds.width / 2 - cellSize.width / 2
    }

     func collectionView(_ collectionView: UICollectionView, layout collectionViewLayout: UICollectionViewLayout, insetForSectionAt section: Int) -> UIEdgeInsets {
        return UIEdgeInsets(top: 0, left: spacing, bottom: 0, right: spacing)
    }

Note

As Amr Mohammd commented, in case of using UICollectionView we can avoid the maths done in our scrollViewWillEndDragging method by utilizing UICollectionView.indexPathForItem(at:).

        let point = CGPoint(x: targetContentOffset.pointee.x + scrollView.frame.midX, y: targetContentOffset.pointee.y)
        guard let indexPath = collectionView.indexPathForItem(at: point) else { return }
        index = indexPath.row
        
        targetContentOffset.pointee.x = CGFloat(index) * cellSize.width

Conclusion

Nothing so fancy. I hope you find it useful. Full demo source is here.

Thoughts about Kotlin multi-platform

For the past two years, I've been working almost daily on a Kotlin multi-platform (KMM) codebase. In this post I'll try to note down my experience with it. I'll try not to judge whether it's good or bad. Let's analyze instead.

Quick KMM overview

KMM is an SDK from JetBrains that's used to build libraries for use in native Android and iOS projects from a single Kotlin codebase. The idea is very appealing, and simplfies earlier attempts to do that using more complex languages like C and C++. Kotlin is a modern language with very good built-in features, standard library, and a production-grade IDE (Android Studio). Developing a shared codebase should be a joy now, right?

The good parts

I'll start with the good things that should go well as expected.

1. Kotlin is really fun to work with

I'm mainly an iOS developer, so I tend to compare any new langugage I use to Swift. kotlin bears some resemblance to Swift. Optional (nullable) types, immutability (val vs var), lambdas (closures), coroutines (async/await), Flows (like AsyncStream but like with more features from Combine), sealed classes (closest thing to Swift enum with associated values), higher order functions, ...etc. Kotlin doesn't have value semantics though...however, it has data classes which if mixed right with immutability, it can achieve the same goals.

2. Having a shared codebase between multiple platforms enforces modular design

Typically, "business logic" is extracted into the shared codebase, leaving native codebases to deal with mostly UI. Architectures like the Clean Architecture can be easily adopted in such setup, where the domain and most of the data layer can live in the shared codebase.

3. I didn't observe a need for many third-party libraries

Things like JSON serialization and networking over HTTP are provided by kotlinx and ktor which are supported by JetBrains. This enables implementing most of the data layer including the so-called service-level or the area of code that deals with JSON and HTTP.

4. It's good to have a single-source of truth

I was lucky to witness a brief time before adopting KMM in the projects I worked on. A whole class of bugs was eliminated. There were no longer discrepancies between Android and iOS that were caused by a semantic error. However, there were still surprising differences in behavior bewteen the two platforms, but for different reasons discussed later in this post.

The not so good parts

KMM is good, but not perfect. Actually, it can be painful sometimes.

1. Build times...at least for iOS

The Kotlin code is compiled to a binary framework that can be integrated into your Xcode project however you like. As the project grows, having to build and generate a new framework each time you make a change negatively impacts productivity. Notice I didn't include saving time as one of the good things above. Basically the time saved by writing a single code is lost due to the increased build time.

2. Debuggability

Unfortunately, breakpoints that work on iOS are not supported out-of-the-box. There is a community-provided plugin by Touchlab. However, I haven't tried it. And personally, I don't feel comfortable getting used to using a community-provided tool in day-to-day work that may lose support in the future. Huge credit to those who are working on it, but I believe one should use the best and safest tools out there for professional projects.

3. Unusual issues

KMM is in beta as of writing this. I had the pleasure (kidding; far from it) to use it while it was in alpha. Eitherway, it's still not mature enough for issues to surface either in compile-time or run-time gracefully with a meaningful error message. For example, the order of defining variables matter. Consider the following code:

class FeatureDIModule {
   private val dependency1 = Dependency1(dependency2)
   private val dependency2 = Dependency2()
}

This code will compile fine. However, at run-time, the app will crash with a SIGABRT error at the line accessing dependency2 and that's it. We were lucky to discover that such dependency should respect the order. That is, dependency2 should be declared before its use, like this:

class FeatureDIModule {
   private val dependency2 = Dependency2()
   private val dependency1 = Dependency1(dependency2)
}

Also, back in the day, before the new KMM memory model, variables shared between threads needed to be frozen even if they're not mutable. Android didn't have that requirement. iOS developers (with fellow QA) had to discover crashes that only happened on iOS. Moreover, coroutines may or may not change threads after a suspension point is reached in a given coroutine. You can think how hard it was to find and fix those crashes. Good news is that this is fixed with the said new memory model.

4. Generated APIs are in Objective-C not Swift

I might be picky here, but I believe I won't be alone. Although you write Kotlin, KMM generates Objetive-C headers for Kotlin code. Effectively, you use the KMM library as if it was written in Objective-C. I think anyone who is reading this knows already how it's not ideal to use Objective-C code from Swift. It's not a deal-breaker, but it's also not ideal.

5. Android knowledge

If an iOS developer enages in the shared codebase, it would be hard to avoid having to deal with Android, even if it's minimal maintenance. For example, a change may break some dependencies on Android. it might be easy to delegate that to an Android team member to take care of the issues. However, I believe it would be better for all parties involved to have knowledge about the other platform to facilitate moving forward. This can be a challenge for a small team.

6. Android-driven design

This may not be technical, but why should we only discuss technical aspects? You may already noticed that KMM makes iOS kind of a second class citizen. While the Android development experience is not affected at all, iOS developers face degraded build times, degraded debuggability, unusual crashes that can be hard to decipher, and clunky Objective-C APIs. But wait, there's more.

It's not a surprise that Android developers will take the lead in designing and implementing whatever happens in the shared codebase. This has undesired impact in my opinion:

  1. Some iOS developers don't have the capacity to learn Kotlin or even don't want to. Unfortunately this reduces iOS develope into mostly UI developers. Therefore, a team adopting KMM can easily repel iOS talents.
  2. Even if there are iOS developers involved, Android patterns and principles will probably prevail over whatever an iOS developer will propose. They have to make peace with that :)
  3. The definition of done can get tricky. Code that is working fine on Android but not on iOS, will likely not be easily contested by an iOS developer having a problem. The most likely outcome will be the iOS developer working around the issue natively if possible. This might sound like a specific team communication problem, but old habits die hard, and it's not odd for a developer to stick to what always worked best, especially if it works alright on their platform.

Conclusion

As I mentioned, no judgments from me. Try it, it may work for you. Personally, I always welcome a new skill. If a team feel the need for having a shared codebase, they might try it in a low-priority project first to have some sense about how things might look like moving forward. And personally, for time and quality sensitive projects, I'd stick to battle-tested boring technologies.

Conventions, conformity, and code review

Conventions, conformity, and code review

I think every other software team now has a set of code conventions to achieve a high level of consistency, which is enforced by a strict code review process.

Consistent code is a joy to work with. It makes sense to make an effort to maintain a high level of consistency in the codebase. However, my argument here is that at some point, clinging to this high bar of consistency can impact productivity. This impact on productivity usually takes the shape of contributors having their pull requests stuck for days, and code owners spending significant time and effort doing police work. Once this becomes a trend in a team, I believe it should be everyone's top priority to eliminate such waste.

Usually, addressing such issues starts with trying to fix this from the contributor's side. Maybe the conventions are not well-communicated? Maybe we need sessions to explain things? Some even consider relaxing some rules. But it's rare to rethink having conventions in the first place.

I can imagine some readers gasping already (and some consultants fainting) when reading โ€œrethink having conventionsโ€. This isn't a rant against conventions though. On the contrary, this is more of an acknowledgment of defeat (as a person who likes code to be consistent) against simple reality. Having one set of conventions to flawlessly rule the constant stream of code asking to be merged daily by a large team seems to be too idealistic. One needs to make compromises here. It was painful for me to witness software teams prioritizing such consistency over shipping that led to constantly missing deadlines.

When teams get that large, they often think of modularization. Be it a multi-module mobile app or a microservices-based architecture, it makes sense to break down things into smaller pieces to facilitate parallel and isolated development. Much of that gain is reversed anyway by installing a bottleneck-like step of code review that makes sure every piece of loosely related code conforms to the same rules and conventions. And worse, such a process is enforced by the same small set of code owners.

Modular architecture depends on APIs. APIs are typically a thin crust of each module. I don't see value in enforcing the same rules and conventions on any code that is not an API. Instead, there should be a minimum shared quality standard. Things that affect security and performance, and not architectural preferences and style.

One caveat of my suggestion is it opens the way for fiefdoms. This is a valid concern. However, I think it's a reminder that software development is a live human activity. I don't think there's a recipe that we can blindly follow without constant monitoring and reevaluation. But I think it's more reasonable to just watch out for such issues if the signs start to show rather than pay a huge cost upfront.

translatesAutoresizingMaskIntoConstraints

(Originally published 2019-09-13)

Did you ever forget to set translatesAutoresizingMaskIntoConstraints to false before adding constraints to a view created in code, and wasted much time in debugging? You are not alone, many of us did.

But did you ever forget to set it to true, and it also did cause other troubles? This is what this article is about.

What is translatesAutoresizingMaskIntoConstraints?

From the docs:

If this propertyโ€™s value is true, the system creates a set of constraints that duplicate the behavior specified by the viewโ€™s autoresizing mask. This also lets you modify the viewโ€™s size and location using the viewโ€™s frame, bounds, or center properties, allowing you to create a static, frame-based layout within Auto Layout.

Note that the autoresizing mask constraints fully specify the viewโ€™s size and position; therefore, you cannot add additional constraints to modify this size or position without introducing conflicts. If you want to use Auto Layout to dynamically calculate the size and position of your view, you must set this property to false, and then provide a non ambiguous, nonconflicting set of constraints for the view.

By default, the property is set to true for any view you programmatically create. If you add views in Interface Builder, the system automatically sets this property to false.

So, in an AutoLayout-enabled view (what you get from using Interface Builder commonly), every view is expected to have constraints to define its size and position. So, as a convenience, if we ever want to manually layout a specific view in a such AutoLayout-enabled view hierarchy, having translatesAutoresizingMaskIntoConstraints set to true (the default) results in translating our changes to the frame (and bounds and center) property into constraints.

So, this is why we set it to false if we are adding constraints to a view in code, to avoid ending up with conflicting constraints. But when do we need to set it to true? As mentioned in the third paragraph from the docs excerpt above, Interface Builder sets this property to false automatically because it expects us to add constraints.

When to set translatesAutoresizingMaskIntoConstraints to true?

So, if you, for any reason, have to define your view in Interface Builder, but also want to manually layout it in code, you'll need to set translatesAutoresizingMaskIntoConstraints to true before layout.

DecodableEither

(Originally published 2019-10-4)

It's not uncommon for the back-end guys to return some JSON where the type of a field is either a number or a string.
This causes inconvenience at the app development level where it's not enough to declare vanilla Codable structs.
Thankfully, Decodable makes this way less messy than first imagined.
We can wrap the either logic in a separate Decodable type that handles this for us:

struct Product: Decodable {
    let id: EitherIntOrString
    
    struct EitherIntOrString: Decodable {
        let value: Int
        
        init(from decoder: Decoder) throws {
            let values = try decoder.singleValueContainer()
            do {
                value = try values.decode(Int.self)
            } catch {
                let string = try values.decode(String.self)
                guard let int = Int(string) else {
                    throw ParsingError.stringParsingError
                }
                
                value = int
            }
        }
    }
    
    enum ParsingError: Error {
        case stringParsingError
    }
}

So, JSON like the following parses successfully:

[
    { "id": 12 },
    { "id": "14" }
]

Generalizing

We can make a generic either type out of this.
All we need is two Decodable types, and a converter from a type to the other.
Let's see:

protocol Converter {
    associatedtype T1
    associatedtype T2
    static func convert(_ t2: T2) -> T1?
}

struct DecodableEither<T1: Decodable, T2: Decodable, C: Converter>: Decodable where C.T1 == T1, C.T2 == T2 {
    
    let value: T1

    init(from decoder: Decoder) throws {
        let values = try decoder.singleValueContainer()
        do {
            value = try values.decode(T1.self)
        } catch {
            let t2 = try values.decode(T2.self)
            guard let t1 = C.convert(t2) else {
                throw Error.conversionError
            }
            
            value = t1
        }
    }
    
    enum Error: Swift.Error {
        case conversionError
    }
}

Let's break this down:

  1. DecodableEither<T1: Decodable, T2: Decodable, C: Converter>: Decodable.
    Here we declare a generic struct that conforms to Decodable, and depends on three types.
    The first two are any Decodable types.
    The third is just a type that conforms to a protocol called Converter that we will use for converting from type T2 to T1.
  2. The Converter protocol declares a static function that converts from a generic type to another.
    Such protocol is called protocol with associated types, commonly called "PATs".
  3. Now, the Swiftiest thing in this code, the type constraints. where C.T1 == T1, C.T2 == T2.
    This part after the DecodableEither declaration is what ensures type-safety and makes things work together.
    Here we tell the Swift compiler to ensure that any Converter type passed to us here must have its two associated types be the very two types passed to the DecodableEither.
    This what makes that line let t1 = C.convert(t2) in the alternate decoding phase work, and infer correctly the given types.

Now, we can use this generic type like this:

enum StringToIntConverter: Converter {
    static func convert(_ t2: String) -> Int? {
        return Int(t2)
    }
}

struct Product: Decodable {
    let id: DecodableEither<Int, String, StringToIntConverter>
}

Usage:

let json = """
    [
        { "id": 12 },
        { "id": "14" }
    ]
"""
        
let products = try! JSONDecoder().decode([Product].self, from: json.data(using: .utf8)!)

products.forEach({
    print($0.id.value) // value is Int ๐Ÿ‘
})

We can also use typealisases if a particular combination is used frequently:

typealias DecodableEitherIntOrString = DecodableEither<Int, String, StringToIntConverter>

struct Product: Decodable {
    let id: DecodableEitherIntOrString
}

That's it. Thanks for reading!

Update (16-10-2019)

I stumbled upon this brilliant suggestion by Jussi Laitinen.
Now, our solution can be cleaner by eliminating the third Converter type, and instead requiring our first type to be convertible from the second type. Let's see this in code:

protocol Convertible {
    associatedtype T
    init?(_ value: T)
}

struct DecodableEither<T1: Decodable & Convertible, T2: Decodable>: Decodable where T1.T == T2 {
    let value: T1
    
    init(from decoder: Decoder) throws {
        let values = try decoder.singleValueContainer()
        do {
            value = try values.decode(T1.self)
        } catch {
            let t2 = try values.decode(T2.self)
            guard let t1 = T1(t2) else {
                throw Error.conversionError
            }
            
            value = t1
        }
    }
    
    enum Error: Swift.Error {
        case conversionError
    }
}

Also, converting from String to Int is a lot simpler now, since Int already has a failable initializer that accepts a String. We just extend Int to conform to our Convertible protocol while stating that the generic/associated type T to be String.

extension Int: Convertible {
    typealias T = String
}

Update (29-04-2020)

Fadi suggested a more generic solution to this problem that leaves the converting step to the user.
I like it. Here it is:

enum DecodableEither<T1: Decodable, T2: Decodable>: Decodable {
    case v1(T1)
    case v2(T2)
    
    init(from decoder: Decoder) throws {
        let container = try decoder.singleValueContainer()
        if let v1 = try? container.decode(T1.self) {
            self = .v1(v1)
        } else {
            self = try .v2(container.decode(T2.self))
        }
    }
    
    var v1: T1? {
        switch self {
        case .v1(let value): return value
        default: return nil
        }
    }
    var v2: T2? {
        switch self {
        case .v2(let value): return value
        default: return nil
        }
    }
}

Unit testing async await

XCTest provides a very convenient way that makes testing methods marked as async a breeze. Just marking the test method as async does the job:

func test_myAsyncMethod() async throws {
  XCTAssertTrue(try await myAsyncMethod())
}

However, sometimes the API of the code we want test is not marked as async although itโ€™s actually async, i.e. it starts a Task under the hood. This makes it hard to test, as we would then resort to expectations which are a bit kludgy. In this article, Iโ€™ll explore a way to maintain the access to XCTestโ€™s async.

The idea is inspired by the clever trick of injecting DispatchQueues to be able to wait for them during tests, discussed in this article by John Sundell.

Consider the following code:

import Foundation
import Combine

@MainActor
class ViewModel {
    @Published var email: String = ""
    @Published private(set) var isEmailAvailable: Bool = false
    
    private var cancellables: Set<AnyCancellable> = []
    
    typealias CheckEmailAvailability = (String) async -> Bool
    private let checkEmailAvailability: CheckEmailAvailability
    
    init(checkEmailAvailability: @escaping CheckEmailAvailability) {
        self.checkEmailAvailability = checkEmailAvailability
        observeEmail()
    }
    
    private func observeEmail() {
        $email.sink { [weak self] email in
            guard let self = self else { return }
            
            Task {
                self.isEmailAvailable = await self.checkEmailAvailability(email)
            }
        }.store(in: &cancellables)
    }
}

So, what this view model does is:

  1. Observe value changes for the email property
  2. Delegates the availability checking logic to the async checkEmailAvailability closure
  3. Updates the isEmailAvailable property with the result

As mentioned before, we cannot make use of XCTestโ€™s async convenience because we have no control over that implicit Task. If you think about it, what we need from the Task object is just an async context. If we can inject something that provides us with such context, maybe we can have a chance to play well with XCTestโ€™s async. Letโ€™s try this step by step.

First, we can safely assume that any closure we will be passing to Taskโ€™s initializer has the following signature:

() async throws -> T

Therefore, we can define a protocol that accepts such closure, and run it:

typealias AsyncClosure<T> = () async throws -> T

protocol AsyncRunner {
    func runAsync<T>(closure: @escaping AsyncClosure<T>)
}

Now, for non-testing purposes, we are interested in a default implementation that runs the given async closure inside a Task. So, we can have this default implementation:

class DefaultAsyncRunner: AsyncRunner {
    func runAsync<T>(closure: @escaping AsyncClosure<T>) {
        Task {
            try await closure()
        }
    }
}

Now, letโ€™s refactor the view model above to inject an instance of this protocol:

import Foundation
import Combine

@MainActor
class ViewModel {
    @Published var email: String = ""
    @Published private(set) var isEmailAvailable: Bool = false
    
    private var cancellables: Set<AnyCancellable> = []
    
    typealias CheckEmailAvailability = (String) async -> Bool
    private let checkEmailAvailability: CheckEmailAvailability
    private let asyncRunner: AsyncRunner
    
    init(
        asyncRunner: AsyncRunner = DefaultAsyncRunner(),
        checkEmailAvailability: @escaping CheckEmailAvailability
    ) {
        self.asyncRunner = asyncRunner
        self.checkEmailAvailability = checkEmailAvailability
        observeEmail()
    }
    
    private func observeEmail() {
        $email.sink { [weak self] email in
            guard let self = self else { return }
            
            self.asyncRunner.runAsync {
                self.isEmailAvailable = await self.checkEmailAvailability(email)
            }
        }.store(in: &cancellables)
    }
}

Good so far. Now, letโ€™s see how can we test this view model. You can imagine how unit testing the view model will look like, so Iโ€™ll focus first on how the mock implementation for the AsyncRunner we will use in the test will look like.

private class MockAsyncRunner: AsyncRunner {
    private var asyncClosures: [AsyncClosure<Any?>] = []
    
    func runAsync<T>(closure: @escaping AsyncClosure<T>) {
        asyncClosures.append(closure)
    }
    
    func awaitAll() async throws {
        while !asyncClosures.isEmpty {
            let closure = asyncClosures.removeFirst()
            _ = try await closure()
        }
    }
}

The idea here is, instead of immediately executing the async closure passed to runAsync like in the default implementation above, we save it to an array. Then before we do our test assertions, we execute all the saved closures in-order. And since we now have access to each async closure, we can explicitly await them at once, maintaining the convenience of asynchronously executing in an async XCTest method. Full unit test code:

import XCTest
@testable import TestingAsyncAwaitExample

final class TestingAsyncAwaitExampleTests: XCTestCase {
    private var viewModel: ViewModel!
    private var mockAsyncRunner: MockAsyncRunner!
    private var isEmailAvailable: [String : Bool]! = [:]

    @MainActor override func setUpWithError() throws {
        mockAsyncRunner = .init()
        viewModel = .init(
            asyncRunner: mockAsyncRunner,
            checkEmailAvailability: { [unowned self] email in
                self.isEmailAvailable[email] ?? false
            }
        )
    }

    override func tearDownWithError() throws {
        viewModel = nil
        mockAsyncRunner = nil
        isEmailAvailable = nil
    }

    @MainActor
    func test_notAvailable() async throws {
        // Given
        let givenEmail = "[email protected]"
        isEmailAvailable[givenEmail] = false
        
        // When
        viewModel.email = givenEmail
        
        try await mockAsyncRunner.awaitAll()
        
        // Then
        XCTAssertFalse(viewModel.isEmailAvailable)
    }
    
    @MainActor
    func test_available() async throws {
        // Given
        let givenEmail = "[email protected]"
        isEmailAvailable[givenEmail] = true
        
        // When
        viewModel.email = givenEmail
        
        try await mockAsyncRunner.awaitAll()
        
        // Then
        XCTAssertTrue(viewModel.isEmailAvailable)
    }

}

private class MockAsyncRunner: AsyncRunner {
    private var asyncClosures: [AsyncClosure<Any?>] = []
    
    func runAsync<T>(closure: @escaping AsyncClosure<T>) {
        asyncClosures.append(closure)
    }
    
    func awaitAll() async throws {
        while !asyncClosures.isEmpty {
            let closure = asyncClosures.removeFirst()
            _ = try await closure()
        }
    }
}

Conclusion

Although this solution looks appealing, Iโ€™d first consider converting my APIs to be marked async. This is vital for structured concurrency, and maintaining a healthy Task hierarchy that makes automatic cancellation possible. Anyway, in situations when this is not feasible or can be inconvenient (e.g. the view model above could expose an async setter method for the email instead of a mutable published property, which breaks the FRP style), I think this solution can come handy.

UserDefaults Is Cached in Memory

(Originally published 2020-05-22)

UserDefaults caches its contents in memory, and loads it on application startup even if it's not used. This is vaguely documented.
From the docs:

UserDefaults caches the information to avoid having to open the userโ€™s defaults database each time you need a default value.

Let's do an experiment to confirm that.

Let's make a very simple app based on the single view app template.
Before doing anything, let's record how much memory does our app consumes before any UserDefaults-related work.

On the iPhone SE 2 simulator: 8.7 MB.

Good. Let's save 100 MB of data to UserDefaults and see what we get.

func application(_ application: UIApplication, didFinishLaunchingWithOptions launchOptions: [UIApplication.LaunchOptionsKey: Any]?) -> Bool {
    UserDefaults.standard.set(Data(repeating: 1, count: 100_000_000), forKey: "data")    
    return true
}

After running that I got: 104 MB.

OK, let's run again removing that code; essentially like our very first run, and see if anything changes.

Now we got: 104 MB.

So, even if we no longer save or read from UserDefaults, just having that data there makes our app consumes what that data worth in memory.

Code for the experiment.

A practical use for guard statements

Maybe it's written already somewhere, but I only took notice of this just now. I originally looked at guard statements as just sugar for inverted if statements that only look good, but don't protect you from bugs. I had the following bug in a PR:

func foo(completionHandler: @escaping (Result<...>) -> Void) {
  bar { values in
    if things.isEmpty {
      completion(.failure(.someError))
    }
    completion(.success(values))
  }
}

A colleague pointed out that I may be missing a return after calling the completion handler in the body of the if statement above, unless I intend to call the completion handler with success right after calling it with failure which seems unlikely.

This was an eye-opener for me. Had I used a guard statement, I would have been forced to insert a return statement; and thus saving me from a bug.

func foo(completionHandler: @escaping (Result<...>) -> Void) {
  bar { values in
    guard !things.isEmpty else {
      completion(.failure(.someError))
      return
    }
    completion(.success(values))
  }
}

To be honest, I always used guards to "sanitize" my code path, keeping failures and exception handling in the else block of the guard(s) in that code, but when the code after the guard was just a single line I tended to turn it to an if for no clear reason, but no more ๐Ÿ˜‰

Sources of Truths

(Originally published 2019-08-30)

It's not uncommon to see a variable in some codebase that looks like this:

var isAlertShown: Bool

Or:

var pageIndex: Int

Such variables are used in order to track some state.
Let's see an example, a contrived one:

We are going to show an alert whenever the app receives a remote notification. But we want to avoid attempting to present a new one if an alert is already shown.
So we are going to use a UIAlertController for this task.
One may write code like this:

class ViewController: UIViewController {
    private var isAlertShown = false

    private func showAlert() {
        guard !isAlertShown else { return }
        let alert = UIAlertController(title: "New Message!", message: nil, preferredStyle: .alert)
        alert.addAction(UIAlertAction(title: "OK", style: .cancel, handler: { (_) in
            self.isAlertShown = false
        }))
    
        isAlertShown = true
    
        present(alert, animated: true, completion: nil)
    }
}

Here we're using isAlertShown to track the state telling if our alert is shown or not.
We have to mutate this variable correctly to ensure it correctly represents the actual state of whether the alert is shown or not.
However, if the alert got dismissed by any other mean than our cancel action, the variable isAlertShown will have a wrong value.

The reason is isAlertShown is not the source of truth. We can avoid such bug if we queried a fresh value from the ever-changing environment itself.
For this particular example, we can check if the presentedViewController property is of type UIAlertController. Like this:

class ViewController: UIViewController {
    private var isAlertShown: Bool {
        return presentedViewController is UIAlertController
    }

    private func showAlert() {
        guard !isAlertShown else { return }
        
        let alert = UIAlertController(title: "New Message!", message: nil, preferredStyle: .alert)
        alert.addAction(UIAlertAction(title: "OK", style: .cancel, handler: nil))

        present(alert, animated: true, completion: nil)
    }
}

Alternatively, we can use a weak reference if we want to be sure that the presented alert is a particular one.

class ViewController: UIViewController {
    private weak var shownAlert: UIAlertController?

    private func showAlert() {
        guard shownAlert == nil else { return }
        
        let alert = UIAlertController(title: "New Message!", message: nil, preferredStyle: .alert)
        alert.addAction(UIAlertAction(title: "OK", style: .cancel, handler: nil))

        shownAlert = alert

        present(alert, animated: true, completion: nil)
    }
}

Once it's dismissed, by any means, the weak reference will be nil. No need for mutations.

Conclusion

So, I think the idea is clear now.
Want to track the download status of some book? Infer it from the existence of the relevant files.
Want to track the current index of a paged UICollectionView? Infer it from the relation of the contentOffset to the contentSize.

This principle is discussed on the web. However, it's more data (or database) oriented.
So, I wanted to discuss it in a close-to-UI context, where we, iOS developers, spend a significant time.

Thanks for reading!

Rendering off Main Thread in iOS

(Originally published 2019-03-23)

One of the first lessons we learn in iOS development is that UIKit classes (UILabel, UIImageView, ...etc) shouldn't be touched outside the main thread. Sometimes we learn it the hard way. However, this doesn't mean we cannot do any form of rendering off the main thread.

Classes like NSAttributedString and UIImage come with methods for drawing to a given graphics context; an image context for our use case. This doesn't mandate being done in a particular thread. Not only this, but UIKit enables us to export what's drawn to the current context to a bitmap image using UIGraphicsGetImageFromCurrentImageContext. This means we can do any complex drawing like we do with CoreGraphics in drawRect:, and then export this to a bitmap.

All what we have to do next is to display the resulting image in our view. This is easily achieved by setting the views layer.contents property to a CGImage representation of our image. And that's it.

Cool, but why?

UIKit performance is great 99% of the time. However, it's not the best we can acheive. UIKit performance degrades noticebly when rendering large scrolling amounts of text and images with varying sizes, in addition to relying on AutoLayout for sizing. AutoLayout came along way in iOS 12, but earlier iOS versions are still in support, and no matter how fast AutoLayout becomes, it still works on the main thread.

AutoLayout is not only the slowing factor. Actual rendering and intrinsic content size calculation also happens on the main thread. I've profiled stuttering scrolling performances and the culprit was none other than regular text drawing invoked from UILabel's drawing.

Rendering and Sizing

If you notice, we're dealing with two types of problems: (1) Rendering, i.e. the graphical content we see, and (2) Sizing, i.e. what space our rendered content will consume.

We talked about rendering methods above. If you notice, those rendering methods rely on a CGRect input, that is the bounding box of the graphical content. So, this implies a prior sizing step. Sizing images is usually easy; as we know beforehand where it would appear, and at what size. Text may be a bit trickier; as we usually fix a dimension (width or height) then let the text flow with respect to the desired alignment, consuming space depending on the font and other text attributes. Fortunately, there are more than one way to calculate bounding rectangles for attributed strings. The simplest method is NSAttributedString's boundingRect. Other ways involve utilizing NSLayoutManager, NSTextContainer, and NSTextStorage trio for advanced text layout.

A Simple Demo

I made a very simplistic demo that showcases the gains in a scrolling use case. Notice the regular implementation (left) stutters on fast scrolling, while the prerendered implementation (right) scrolls like the wind. One cost is to engineer when to pre-load the pre-rendered conent. I went with an inefficient way for the sake of simplicity (i.e. loading all beforehand). This is a real cost for such approach.

Where to go from here?

I'm just exploring this technique myself. It's not something new. There are already amazing libraries which adopt this approach; namely Ryan Nystrom's StyledTextKit, and Texture (AsyncDisplayKit).

Notes

  • When using UIGraphicsBeginImageContextWithOptions, take some notes:

    • The third parameter is the scale at which the bitmap is generated. A zero values picks the device's scale (i.e. 2x, 3x). This helpful in emulating vector drawing behavior in zoomable views by redrawing content at a higher scale (e.g. device scale * zoom scale).
    • Don't forget to call UIGraphicsEndImageContext after done dealing with the image context. This is to clean up memory. This approach can use memory extensively, it's a really important step.
    • The second parameter is whether to draw opaquely or transparent. If you know that your view is going to be not transparent, it's good to set this to true, as transparency is a computationally expensive task. See this WWDC session at 29:28 mark.
  • Use a serial DispatchQueue instead of a gloabl queue if you're going to render multiple views in series, or group them in a single block to be executed in a global queue. Anyways don't execute each block individually in a gobal queue. This to avoid creating more threads than CPU can handle; what's called "Thread Explosion". See this WWDC talk at 16:42 mark.

  • When using NSAttributedString's boundingRect:

    • You have to use an NSAttributedString instance with at least .font and .foregroundColor attributes set, or else it won't give correct results.
    • The first CGSize parameter it takes marks what constrained dimension it expects, and what other dimension to compute. For example, to emulate the behaviour of a UILabel with numberOfLines set to 0, you provide a fixed width, and a height value of .greatestFiniteMagnitude. Example.

Update (06-09-2019)

This made its way to a talk at a SwiftCairo meet-up. You can find the slides and a sample code here.

Augmenting MOLH

(Originally published 2020-04-01)

MOLH is a popular library among developers whose audience are of Arabic background. It's common for Arabic apps to support multiple languages, and also support changing between them without restarting. I wrote here how iOS doesn't support that out-of-the-box and what were the possible workarounds back-then (this was a write-up for a solution I reached before MOLH was made public).
In this article I'll try to briefly reiterate how MOLH works to reach to its limitation, and then try to find some solutions/workarounds.

Before we start, these limitations are not specific to MOLH; it's rather general to any approach that tries to work around iOS's limitation to change the app's language without restarting.

How MOLH works

(Feel free to skip this section if you already know how MOLH works)

Two aspects of an app reflects to the user that it respects the desired localization: the language of the texts, and the direction of how the flow of the views (left-to-right or right-to-left).
As you may already know, the default behavior of iOS is to pick and suitable language at startup (of the app) and upon that it picks the relevant strings from string files in that language's lproj folder, as well as applying the corresponding language direction, and sticks to that.

Two goals here:

  1. Guiding NSLocalizedString to search the new language folder (i..e ar.lproj, en.lproj, ...etc)
  2. Forcing new views to flip (or not) with respect to the new language.

(1) NSLocalizedString

NSLocalizedString delegates to NSBundle.mainBundle for getting the suitable localized string value.
Upon app startup, NSBundle.mainBundle makes up its mind once and for all on what language folder it's going to search till the next run. To overcome this limitation, MOLH swizzles the main bundle and dynamically loads the relevant bundle to search for the required string.

(2) Flipping views

This is somewhat easier. UIView formally supports forcing the language direction independently of the actual app language. This is done via setting the semanticContentAttribute to the desired value.
MOLH does this for all newly created views by using the appearance proxy to set the suitable semanticContentAttribute. This is why it needs the app to virtually "restart" (i.e. start over from the root view controller, re-creating all views).

What MOLH doesn't solve (and it doesn't have to)

Formatters

There are some classes that must pick some locale information to correctly present its data. Such classes include formatters (e.g. NumberFormmatter and DateFormatter). If we don't explicitly set the locale property of such formatters to the desired language, it will pick the actual app language, causing a date to be displayed in the wrong language for example.

let dateFormatter = DateFormatter()
dateFormatter.locale = Locale(identifier: "ar")

NSTextAlignmentJustified

Formatters are easy to handle as we saw. However, justified UILabel and UITextView yield unwanted results. This is because justifying works by distributing space in every line of text so that each line starts and ends at the same start and end points respectively, and aligning the remaining last line either left or right if it's not wide enough. As you you may already guessed, left or right alignment is picked according to the actual app language.

incorrectjustify

Unlike formatters, there seems to be no explicit way to guide UILabel nor UITextView on how to force that alignment. However, there's a way to achieve the desired justifying with NSAttributedString.
NSAttributedString (a world of its own) accepts an attribute called paragraphStyle.
What matters to us from it is the baseWritingDirection property. We can set it to either to NSWritingDirectionLeftToRight or NSWritingDirectionRightToLeft. This affects decisions that rely on such information, namely justifying and natural alignment. Sample code:

let attributedString = NSAttributedString(string: string, attributes: [
    .paragraphStyle: {
        let style = NSMutableParagraphStyle()
        style.alignment = .justified
        style.baseWritingDirection = .rightToLeft
        return style
    }()
])

Demo

I made a demo of these problems (without the solutions). You can check it here. Make sure to read the usage notes before inspecting.

Thanks for reading! Corrections and suggestions are welcome.

WKWebView Horizontal Paging

(Originally published 2017-11-03)

UIWebView had a helpful property named paginationMode. It gave you horizontal pagination out of the box; specifically using the values: leftToRight, and rightToLeft. However, UIWebView is going out of favor, and since iOS 8, Apple officially encourages using WKWebView. Unfortunately, WKWebView doesn't have that property nor its equivalent out of the box.

Thankfully, horizontal pagination (left and right) is doable using CSS. CSS has a helpful property called column-width. Using that results in segmenting the html body into columns of the specified width. So, the idea is as follows:

  1. Set the column-width property of the body to the webview's width.
  2. Set the height property of the body to the webview's height.
  3. Set isPagingEnabled of the webview's scrollView to true.

That's it (for left to right content though). It's up to you where to set the above values. For example, you can do it in webView(_:didFinish:) of the webview's navigationDelegate.

Now, RTL support.

It's as simple as setting the direction style property of the html tag to rtl. But if that somehow badly affects your page, then you have to get more creative. One crazy solution is as follows:

  1. Wrap all the contents of the <body> tag in one container div.
  2. Set the -webkit-transform property of that div to scale(-1, 1). (i.e. this results in horizontal mirroring)
  3. Similarily, mirror the webview itself. (i.e. webview.transform = CGAffeineTransform(scaledX: -1, y: 1))

Credits:

Thanks to my friend and colleague Sayed Arfa for suggesting column-width and overall inspiration.

Update

At the time of writing this post, I somehow missed this thread. They suggested to use the undocumented(?) CSS property value overflow:-webkit-paged-x. This is more convenient than what's explained above as it doesn't need us to compute a width nor do additional work for RTL handling. However, it doesn't seem reliable, as the chromium project seems to plan to remove it.

Thoughts about the ViewModel

The following is a typical view model in an MVVM setup:

class PostsViewModel {
  @Published var posts: [Post] = []
  
  func viewDidLoad() {
    // 1. Get an array of Post objects from the model layer...
    // 2. Update the observable exposed `posts` property with it
  }
}

It acts as a mediator between the view and the model. It exposes observable โ€œoutputโ€ properties to which the view can bind, and exposes โ€œinputโ€ methods (or observable properties) that respond to user actions. No problems so far, however, two things about that I canโ€™t get over:

  1. Who defines the view modelโ€™s API?
  2. How much logic can the view model contain?

Who defines the view modelโ€™s API?

In a codebase where there are no hard boundaries between layers, this can go unnoticed. However, in codebases that follow an architecture that defines hard boundaries between layers, one can spot such nuisance easier. Letโ€™s take the Clean Architecture as an example. A typical codebase that follows this architecture will probably define the following modules/packages for each layer (either for the whole project or per feature):

  • Domain
  • Data
  • Presentation
  • UI

The hard dependencies will be like this:

pako_eNpdjjEOwjAQBL9ibZ18wAWVGzokoLvmFB_EAp8j51ygKH_HUCG61e5otBumEgUe98rL7C6B1LnAxm4cDy6UzElJyU5VVlFjS0X_puvxW_wSGJCldiB28_ZREmyWLATfY-T6IJDuneNm5fzSCd5qkwFtiWwSEvdDGf7Gz1X2N-nBN_M

You can notice here the UI module depends on the Presentation module where the view model is defined. So, this is a clear decision that the view has no say in defining the API of the view model. However, I believe that for the view model API to make sense, i.e. convenient to the needs of the dependent view, then it needs to closely resemble how the view is actually structured and how it behaves. And, I4 think this is what really happens in a codebase where such hard module dependencies do not exist. The view is envisioned first, and the view model is modeled after it for convenience. If the view model is designed truly without the view being in mind, I can see the complexity creeping into the view to adapt to the view model API, which kinds of defeats the point of the view model being a convenience to the view.

My proposal here is that maybe the view model can have its protocol defined in UI while its implementation still living in Presentation. The dependency graph above may look like this:

pako_eNqFjrEOwjAQQ38l8tz-QAamLGxIwJbl1Bw0glyq9DJUVf-dQ3wAniz7SfaOqSaGx7PRMrtbiOJMgZTcOJ5cqIWy_MJL45VFSXOVf6W19zMGFG7GJBvYv1yEzlw4wptN1F4RUQ7jqGu9bjLBa-s8oC-JlEMm-1XgH_Re-fgAU9g3wA

But we now have a regression. Presentation can now see irrelevant public UI components such as view controllers. To fix this, maybe the view model protocols can have their own module:

pako_eNp1T7sKwzAM_BWjOfkBD528dCgE-pi8iFhtTGMrODKhhPx71XYMvUmc7o67FXoOBBYeBafBXJzPRuFQ0LTtwThOGPOP7ArNlAUlct49r8cvdYu0nDRx7AoL9zzOf7x7ITSQqGhi0Drrx-ZBBkrkweoZsDw9-LypDqvw-ZV7sFIqNVCngEIuoq5IYO84zrS9ARo7SFc

Overkill? Maybe. But I think the intents are clearer that way.

How much logic can the view model contain?

Now, regardless of where the view model (or its protocol) should be defined, I also have an issue with the responsibilities of the view model implementation. I think I wonโ€™t be so wrong if I claim that 90% of the code in the view model has to do with interaction logic and UI state management. Things like calling the right application service/model/use case/repository/whatever when the relevant UI event happens, or saving what items did the user selected on a UI list. A clever developer may offload/delegate as much of such logic to separate components, especially when context-independent logic is added to the mix like pagination or input validation. However, the view model will still be the gateway to such components.

All this feels to me way more than a โ€œview modelโ€ should handle. In fact, I like to think about the view model beingโ€ฆjust a model of the view; a pure data structure where the brain of the app can interact with it as if it is interacting with the actual user-visible view without all its framework baggage. Similarly, the view can bind to it without having to do non-trivial conversions.

So, the proposal here is:

  1. Reduce the view model to a DTO-like structure.
  2. Move the interaction logic, state management, and view model update to a separate component (be it called an interactor, logic controller, โ€ฆetc).
  3. View models are injected to both the view and the interactor.

I made a simple project demonstrating this idea here. You may notice the view model in this example might be breaking some good practices in class design like exposed mutability. However, I donโ€™t see the required complexity to work around that worth the effort. Even more, I think sometimes we get too obsessed applying such practices that it reversed some gains made possible by Swiftโ€™s features, but hopefully I will discuss this separately in a later post and link it here.

Is mutability always bad?

Consider the following Swift struct definition:

struct Person {
  var name: String
}

If you think the var in the struct above should have better been declared as let, then this article is for you.

Immutability has been one of the best practices in class design. That is, everything should be immutable unless mutability is actually needed and cannot be avoided. This can be seen in modern languages like Swift and Kotlin where they have keywords to control mutability like var, let, val, โ€ฆetc. This have evidently worked well, and everyone started to apply it everywhere possible, even when making Swift structs. I used to think the same, until I saw this tweet from Nick Lockwood.

Screen Shot 2023-02-12 at 8 42 00 PM

It was an eye-opener for me. Recall the struct example above. The issue with it was that seemingly the properties could be mistakenly mutated from anywhere in the code, and thus cause bugs. Except that itโ€™s not that easy to happen when working with value semantics. One reason to this surely is that sharing value types causes them to be copied, and the mutable copies will only be mutated in isolation to the others. The other reason - which this article is about - is that property mutation is possible only if the encapsulating instance is also mutable. Letโ€™s make a small experiment. Letโ€™s declare an instance from that struct:

let person = Person(name: "Adam")
person.name = "Ali"

That code wonโ€™t compile, which is the same effect as if the name property was declared as let. That is because the struct instance is declared as let, although the property is declared as var.

Letโ€™s make another small experiment. Letโ€™s do the opposite this time; which is, we will declare the name property as let, but the struct instance will be declared as var, and try to mutate the name property again:

struct Person {
  let name: String
}

var person = Person(name: "Adam")
person.name = "Ali"

That wonโ€™t compile either, which makes it safer than if the name property was declared as var, right? Not really. The following compiles:

struct Person {
  let name: String
}

var person = Person(name: "Adam")
person.name = "Ali" // โŒ Doesn't compile
person = Person(name: "Ali") // โœ… Compiles just fine

We effectively succeeded in mutating the name property, although it is declared as let. And what I mean by โ€œeffectivelyโ€ here is that although the name property was not mutated the way youโ€™d conventionally expect, the code that will be using the mutable person copy above will get the new name value anyway as if it was conventionally mutable.

Also, using var by default in structs brings some convenience when manipulating such values. Consider:

var frame = makeFrame()
if style == .centered {
  frame.origin.x = parentBounds.midX - frame.width / 2
}

If we assume CGRect had let properties, we would need to do the following:

var frame = makeFrame()
frame = CGRect(
  x: parentBounds.midX - frame.width / 2, 
  y: frame.minY, 
  width: frame.width, 
  height: frame.height
)

And you can see where it is going if you really want to eliminate entirely the use of var in this example.

Conclusion

The takeaway here is not against the immutable-by-default principle. Rather, it feels like this is similar to some design patterns that donโ€™t really fit in a language that has superior features the solve the same problems. This idea was discussed in this famous article by Paul Graham, especially the note about Peter Norvig findings:

Peter Norvig found that 16 of the 23 patterns inย Design Patterns
ย were "invisible or simpler" in Lisp

And I find this a great opportunity to express some admiration of some of the philosophies of Swift. I find value semantics one of the most unique and impressive features of Swift. What I like about it is that it combines the safety of the immutable functional programming style with the intuitive convenience of the imperative style. You can notice this best-of-both-worlds philosophy in other features as well:

  • Async/await enables doing async programming in a familiar serial structured style (compared to the somewhat steep learning curve of the functional reactive style of Combine for example)
  • Type inference combines the cleanliness of dynamically typed languages with the safety of statically-typed languages

Thoughts about Clean Architectureโ„ข

Thoughts about Clean Architectureโ„ข

The clean architecture is an application architecture popularized by Robert C. Martin. You may be already familiar with it or its name. If not, that's ok. If you know about architectures such as MVVM, you're mostly there. I'll try to organize my thoughts according to the following:

  1. Quick overview of the architecture and what is promises to deliver.
  2. Promised wins and my personal opinions on how much each of them is achieved.

๐Ÿ’ก Note that I'll be discussing a flavor of it that got popular among mobile developers, iOS and Android alike. That form of the clean architecture may not be 100% in line with what Robert C. Martin originally intended or what he would personally do.


<rant>
Before we begin, I must mention that I have a pet peeve with the architecture's name. I really think it wouldn't have been that popular if it was named otherwise. This is why I stylized it as Clean Architectureโ„ขย in the title. I believe intuition is king. The word clean works wonders especially with new developers. It can also cause those who don't adopt it to look down on their code because it's not "clean".
</rant>

Quick overview of the clean architecture

I'll try to tackle this point from the developer's point of view. I think most of us progressed in a similar way with respect to architecture. It was something like this:

  1. Apple's MVC.
    1. AppDelegate was a big deal, and contained so much important logic.
    2. Network calls casually happened in view controllers.
    3. Singletons were convenient and abundant.
    4. No tests.
  2. A better MVC.
    1. Things started to move out from the app delegate and view controllers to models (the M in MVC)
    2. Singletons were probably still there, but used in places that made sense.
    3. Tests started to appear. But since a good deal of interaction logic was still in view controllers, tests didn't cover that area.
  3. MVVM (or MVP)
    1. Interaction logic also moved out from view controllers to view models (or presenters).
    2. View models and presenters made it easier to test interaction logic.

While at this point things started to look much better than before, to some, there was still some imperfections to say the least. To some they saw it as flaws. Namely, what's known as business logic, or what the clean architecture like to call, domain logic. To be fair, depending on the problem at hand, it's hard to draw clear lines where does domain logic begins or end. It maybe be easy to draw the lines for a shopping cart app, but what about a drawing app, or a JSON processor app? In such apps, domain logic can easily get mixed with UI and data logic respectively. Anyway, based on that reasoning, the clean architecture builds upon that notion of boundaries, and breaks down the app to the following layers (typically represented as modules, but we won't discuss this now):

  1. Domain. This is the centerpiece of the architecture. This layer doesn't not depend on any other layer. It also shouldn't expose any 3rd party dependency in its APIs (and ideally nor system APIs as well). It contains business rules represented as models and use cases.
    1. Domain models. A domain model is a plain "POJO" that contains just enough data that delivers to the user a specific value. For example, in a shopping cart app, CartProduct sounds like a valid domain model. That CartProduct can look like this:

      data class CartProduct(
        val productId: String, 
        val productName: String, 
        val isAvailableInLimitedAmount: Boolean
      )

      In UI, products that are available in limited amounts may be required to be displayed differently, with a different text color for example, to urge the user to checkout quickly (hello dark patterns ๐Ÿ‘‹). The takeaway here is that a domain model shouldn't include something like text color. Instead, it should include what piece of information valuable to the user it's trying to communicate, and presentation (or UI. That's a different debate ๐Ÿ˜…) should translate that to a text color.

    2. Use cases. You can imagine them as functions in suits ๐Ÿ•ด๏ธA use case is a function-like object whose a single method (e.g. executeor whatever syntactic sugar the language offers like Swift's callAsFunction). Each use case returns (or accepts, or both) a domain model. So, for the domain model given an example above, the use case returning it would be something like GetCart.

  2. Presentation. Here live view models. They delegate to use cases to pull/push data to/from the UI. Their sole responsibility now is managing temporary state and managing interaction. No "business logic" here anymore.
  3. UI.
  4. Data. It depends on domain, and shields it from dealing with the intricacies of managing data, be it remote or local. This layer itself is broken down into other layers:
    1. Repository (some call it Gateway). Use cases define their interfaces. They cater the needed domain models to use cases. As a result, it's not unusual for business logic to actually end up in the repositories, rendering use case as pass-throughs. Repositories depend on local and remote data sources to properly construct the required domain models.
    2. Data Sources. A data source can be thought of as a shell over an actual data source like a web API or a data base. They majorly expose a CRUD kind of an API. A repository is the one that knows who to make meaningful domain models out of data models returned by data sources. A data source can be local or remote.
      1. Local. It can wrap an in-memory structure, a locally persisted file of some popular format (json, xml, ...etc), shared preferences, user defaults, a sqlite database, Core Data, Realm, ..etc. Most of the time it's considered as a cache, but for sure in some cases they are the primary source of truth.
      2. Remote. It can wrap any kind of network-based data sources like REST, RPC, sockets, ...etc.

I think this was enough of an overview. Let's see what the architecture promises.

Promised wins

There are multiple goals developers usually have in mind when adopting this architecture. In no particular order and no claim of being exhaustive:

  1. Domain-driven design.
  2. Development parallelism.
  3. Testability.
  4. Common language (screaming architecture)
  5. Decoupling.

Domain-driven design

As mentioned earlier, the architecture advocates a domain-driven design. Use cases and domain models shouldn't be affected by what kind of UI is being used. The same domain layer can be used in a mobile app and a command line app for example.

While being the hallmark of the architecture, I think this gets broken quite often. The issue is not with developers doing something wrong I believe as it's with how tricky the concept really is. Take a dashboard feature for example. The concept is naturally heavily UI-driven. Having a use case with the word "dashboard" in its name triggers some clean architecture zealots/connoisseurs. The quick remedy is often just a name replacement with a word like "statistics". In my opinion, that's just a hack. Why should a particular set of statistics be grouped like that in a single use case unless it's expected to be displayed in a single hard-to-decompose UI component? To raise the argument in a different way, imagine the user interface is a voice-based assistant like Siri. Usually the user asks a question and expects a brief answer, not a dashboard-sized bucket of information. Does it still make sense to reuse the same use case for such interaction?

Development parallelism

The layer/boundary decomposition works from a task organizing point of view. Since each layer defines their own models and interfaces to interact with other layers, working on implementing multiple layers at once is achievable. For example, once domain models and use cases are defined for a given feature, work on presentation and data can start in parallel.

Testability

Since logic is now spread across multiple layers, the responsibility of each class becomes smaller. Dependencies represented as interfaces (dependency inversion protocol in action) makes it easier to mock them in unit tests.

However, there's something inconvenient about writing unit tests for heavily broken down code like this. At some point, especially in the data layer, tests become brainless and the amount of mocking vastly outweighs the actual logic being tested, to the extent you sometimes feel you're testing the mocks. Mocking code can outgrow actual code that it might exceed it in bugginess. This may not be a problem with the architecture per se, but maybe of how it become popular to view each class as a unit that must have its own tests.

Common language

The template nature of the architecture makes it easier for new developers to expect where they can find a particular type of logic. This is usually referred to as a screaming architecture. My only problem with this is that I believe this backfires in terms of creativity. Shoe-horning any application to fit a uiโ†’viewModelโ†’useCaseโ†’repository interaction feels absurd and bureaucratic sometimes or most of the time depending on the problem at hand.

Decoupling

One of the goals of the architecture is to decouple components from each other, and more importantly decouple domain from any framework or library dependency, be it 3rd party or system-provided. This sounds good to everyone most of the time, but it comes with shortcomings. The architecture puts much faith in programming languages. Recall its requirement that domain shouldn't expose a library dependency in its API. This prohibits using something like Rx's Observable types in the use case signature for example. However, developers usually solve this problem by simply breaking that rule for Rx. This is one example from a popular clean architecture sample on Github:

import Foundation
import RxSwift

public protocol PostsUseCase {
    func posts() -> Observable<[Post]>
    func save(post: Post) -> Observable<Void>
    func delete(post: Post) -> Observable<Void>
}

Domain models being POJOs suffer a similar problem. Take a library like Realm for example. One of its selling points is what they call zero-copy, or what basically means, the object in hand is just a holder of pointers for fast access to data saved on disk. So, a model like this (taken from their docs):

import io.realm.RealmObject

open class Frog(
    var name: String,
    var age: Int = 0,
    var species: String? = null,
    var owner: String? = null
): RealmObject()

won't actually store any property of those in memory when fetched, but each property will be a proxy/getter that knows where exactly the needed data in the persisted file and will return it each time it's called. This is cool for some performance-wise. However, having to copy those into plain POJO domain models you simply lose that feature completely. Some may see that's violating the separation of concerns principle and mixing business and data/persistence specificities. That's fair point, but I wouldn't judge this as wrong. I believe the architecture being lacking in supporting such features is better admitted than doubling-down and mocking other approaches. That stance of looking down on to conflicting approaches is sadly abundant among this architecture's adherents.

And to expand more on copying, to construct a domain model, a quite good deal of copying is usually done across layers. First the deserialized object fetched from the API for example is copied to a model that is returned by the remote data source to the repository for further processing. The repository in turn copies that model again to the domain model. Most of the time all these versions look exactly the same, with the exception of the deserialized object having an annotation or is a subclass of a reusable deserializer library object. I haven't seen the architecture applied in a performance-sensitive contexts. I don't know really how this problem can be solved without breaking the architecture's principle.

Conclusion

The architecture works, but I don't like it. However I can live with it since it's became an industry standard, at least in mobile development.

I think the architecture has some non-trivial negative impact and shortcomings as demonstrated, but unfortunately its adherents exacerbate its dislikability by alienating the criticizers. The culture around it really triggers some gut alarms. Maybe because it's marketed at developers how feel insecure about their ad-hoc architectures? The populist nature (if you allow me) of its terminology also works well marketing-wise; starting from claiming the word "clean" to the liberal use of strong words like right, wrong, good, bad, etc. by its proponents.

I would expand more on the negative cultural impact of it in this article, but I tried to avoid ranting as possible. So, maybe twitter is a more fitting place for such noise :)

Covert Coordinators

A coordinator is an architectural component that rose into fame the last couple of years or so. It primarily solves the problem of tight coupling between view controllers regarding their presentation and dismissal. You can learn more about it here.

To summarize, coordinators solve the tight coupling problem by extracting destination view controller creation and navigation implementation details from a source view controller to a coordinator object that manages that flow. So, let's have a simple example.

We have an app that is composed of a view controller (let's call it MainViewController) that is embedded in a UINavigationController, and has a button that pushes a SettingsViewController when tapped.

Coordinators avoid doing this:

class MainViewController {
    @objc func showSettingsButtonTapped(_ sender: Any?) {
        let settingsVC = SettingsViewController()
        navigationController?.pushViewController(settingsVC, animated: true)
    }
}

And do this instead:

class MainViewController {
    weak var coordinator: Coordinator?
    @objc func showSettingsButtonTapped(_ sender: Any?) {
        coordinator?.showSettings()
    }
}

Without writing it explicitly, the code for creating and pushing SettingsViewController went to the coordinator's showSettings().

Covert Patterns

The goal of this article is doing the above exactly without explicitly spelling out "Coordinator". But let me first show what value I find in doing that.

I like to think of a pattern as a form that code evolves into while seeking a set of goals and respecting a set of principles. I find elegance in code developing healthy patterns without expanding the code's vocabulary as possible. Can we achieve the same goals without the "Coordinator" word (or any equivalent)? Let's see.

Let's start with the above code snippet:

class MainViewController {
    weak var coordinator: Coordinator?
    @objc func showSettingsButtonTapped(_ sender: Any?) {
        coordinator?.showSettings()
    }
}

Let's replace the coordinator dependency with a closure:

class MainViewController {
    var showSettings: (() -> Void)?
    @objc func showSettingsButtonTapped(_ sender: Any?) {
        showSettings?()
    }
}

Good. Now, we need to know how the closure is passed and where it's implemented. Coordinators often rely on a container view controller, commonly a UINavigationController. Why not directly use a UINavigationController subclass then? Let's try that.

class MainNavigationController: UINavigationController {
    override func viewDidLoad() {
        super.viewDidLoad()
        let mainVC = MainViewController()
        mainVC.showSettings = { [weak self] in
            self?.pushViewController(SettingsViewController(), animated: true)
        }
        setViewControllers([mainVC], animated: false)
    }
}

Here we subclassed our root navigation controller, and supplied MainViewController's showSettings() implementation. I find this simpler while maintaining the same gains.

Actually I think there's an advantage to this approach over coordinators. If you notice, while using coordinators, MainViewController could call any method it wants from the coordinator property, even if it's irrelevant. Supplying a single closure to call looks much cleaner to me.

Have a look at a sample project where this is implemented. The sample also shows the case of a child flow that would be implemented by so called "child coorindators".

Final Word

As you see, this was an opinionated article. We don't have to agree on this. Feel free to leave your feedback. Thanks for reading.

Non-Repeatable viewDidAppear Logic

(Originally published 2019-02-05)

Sometimes we need to show an alert, apply a gradient, or conditionally show another view controller on the startup of a view controller. We wish to do such thing in viewDidLoad, however we end up doing it in viewDidAppear(_:). This is because such purposes have requirements that are not fulfilled when viewDidLoad executes; e.g. frames are not yet correct, view hierarchy is not ready, ...etc.

One annoyance with viewDidAppear(_:) is that it can get called multiple times. For example, if you present a new view controller, then dismiss it sometime after, it gets called again. You have to handle such logic that shouldn't be repeated.

Solutions that work, but I don't quite like

1. Booleans

One can introduce a Bool like viewAppeared; checking and setting it for once:

var viewAppeared = false

override func viewDidAppear(_ animated: Bool) {
    super.viewDidAppear(animated)

    if !viewAppeared {
        // Do non-repeatable logic...
    }

    viewAppeared = true
}

It works. However, I tend to try to avoid "state variables" as much as I can (doesn't mean I succeed much ๐Ÿ˜…). Although they look simple, bugs find their way around them. And in this particular situation, you may need to repeat some check you did earlier in viewDidLoad, and it gets less nice:

var name: String?

override func viewDidLoad() {
    super.viewDidLoad()

    if let name = name {
        // conditional initial setup 
    }
}

override func viewDidAppear(_ animated: Bool) {
    super.viewDidAppear(animated)

    if !viewAppeared {

        // this check again
        if let name = name {

        }
    }

    viewAppeared = true
}

2. Deferring with GCD

Magic. GCD helps in executing code later. There are two ways to do it for our need: async and asyncAfter(deadline:execute:). We can use either in viewDidLoad to execute non-repeatable code "later enough".

asyncAfter(deadline:execute:) is straight forward:

override func viewDidLoad() {
    super.viewDidLoad()

    DispatchQueue.main.asyncAfter(deadline: .now() + 0.1) {
    // Non-repeated logic
    }
}

Why 0.1 seconds? No idea. It's just late enough. It works, but it depends on a magic number, we don't know exactly when this code runs.

What about just async? It works too, no explicit delay needed. That's because code in a DispatchQueue.main.async block is executed in the next run loop.

Believe me, I've read a lot about run loops, I still don't understand them much. However, for the main thread, you can interpret them as time slices in which the main thread accepts input, updates UI, calculate layouts, and more importantly "polls" code enqueued via DispatchQueue.main.async.

So, When we dispatch code async on the main queue from the main thread, it doesn't run immediately; it waits to be polled in the next run loop, leaving enough time for the requirements mentioned above to be fulfilled. Remember our blog post? ๐Ÿ˜‚ Now let's continue it. This GCD thing worth it's own blog post.

If you look at code I wrote (I hope you don't), you'll find me guilty of using this to hack my way through. It's not good, I don't recommend it. We should invest more time to really solve latency problems rather than working around them.

A Better Solution?

Here I suggest a solution that I think is better. GCD gave us a hint, we need to queue tasks on viewDidLoad; but execute it later. So, what about queuing it on viewDidLoad, then execute it on viewDidAppear(_:)?

private var viewDidAppearQueue: [() -> ()] = []

override func viewDidLoad() {
    super.viewDidLoad()
        
    viewDidAppearQueue.append {
        // Our non-repeatable logic
    }
}
    
override func viewDidAppear(_ animated: Bool) {
    super.viewDidAppear(animated)
        
    // Dequeue tasks and execute them in FIFO order
    while !viewDidAppearQueue.isEmpty {
        viewDidAppearQueue.removeFirst()()
    }
}

We introduce a simple array of closures. We add our tasks as closures in viewDidLoad. Then in viewDidAppear(_:) we execute each closure and remove it from the array. If there are no tasks; nothing happens, just what we need.

We also don't need to weakly capture self (i.e. [weak self] in) when appending closures. This is because strong references to the closures are lost when we remove them from the array. So, we should be safe.

Thanks for reading. Feedback is welcome.

Simple Overflowing Paginated UIScrollView

(Originally published 2019-05-12)

So, I was using this beautiful Quran app Ayah. I noticed something cool about how it pages its content; there is a visual divider between each two inner pages, and a different one between outer pages. See the below gif for clarity.

ayah1

Preliminary Analysis

You may see such effect being called "Overflowing Pagination". This is not uncommon, and there is good write-ups on how it can be achieved; for example: Soroush's articles 1 & 2. Also allow me to plug in an earlier experimentation of mine ๐Ÿ˜.

But...I overthought the problem. As usual.

Techniques mentioned above deal with a trickier problem; paging with a page size different than the scrollView's bounds width (the default behavior you get with isPagingEnabled). Luckily, to achieve what we saw in the video, we don't need any of this.

If you notice, you'll see that although there are two different looking separator views, they are of the same size. So, this gives us an idea. Instead of having the width of the scroll view being equal to our screen, we increase it by how big we want our separator views to be (with the extra width being evenly distributed over both sides). Moreover, we center the scroll view in which the extra portions are off-screen. And that's it. Here's a sample code, and a demo of it below.

overflowing

And as you may already know, as this applies to UIScrollView, then it applies to UIPageViewController (as in the linked sample) and UICollectionView with isPagingEnabled.

Thanks. Looking forward for your feedback.

Animating With Core Graphics If You Have To

(Originally published 2020-05-23)

Skip directly to the code if you don't have the time.


If you want to do custom drawing; that is, the kind of drawing that cannot be simply achieved by composing existing UIKit classes (e.g. UILabel, UIImageView, etc...), there are two main approaches to do that. Namely, there is the Core Graphics way, and the Core Animation way.

If you tried to play with these before, you may have noticed that animating with Core Animation is easier (it's in the name as you see). This is because you build your custom view using CALayer subclasses (CAShapeLayer, CAGradientLayer, etc..) that have animatable properties by default.
So, it's a matter of utilizing the rich animation APIs Core Animation provides like CABasicAnimation and CAKeyframeAnimation.

However, it's not the case with the Core Graphics way.
Just as you override draw(_:), you'll draw how will your view look in a single frame, depending on what data your view has. There is no high-level component of your drawing that you can communicate with to change its state. All your drawing can be thought of (and essentially is) a single bitmap (think: like a png image).

So, any change we want to do to our view, we change the necessary underlying data, then request our view to re-draw by calling setNeedsDisplay(). That's it. There's no other way.

Perfect, now, how to animate such changes?

We have to have at least a basic understanding of how a basic animation is done.

What we consider a smooth animation can be thought of a series of frames that gradually completes a story. Each frame shouldn't provide so much change; or else we would lose the smoothness (called jankiness, jittery, jumpiness, stutter, etc..). These frames also should arrive quickly one after the other for the same purpose.
For digital displays (computer monitors, mobile phones, etc..) sampling natural motion at a rate of 60 frames per second is considered ideal. We can drop to the 30s and still maintain acceptable results. We can go up to 120 too for luxury (as in the latest iPads). However, for most app uses-cases we deal with on a daily basis, 60 frames-per-second is our target.

Out of this theory, we can come up with two requirements:

  1. Our single frame shouldn't take more time than 1/60 of a second to be made.
  2. Even if we generate each frame under 1/60s, we still need to synchronize with the system's refresh rate. That is, when does the system request our frame to be delivered.
    This is because even if our frame is generated under 1/60s, beginning frame generation just at the end of the expected frame duration will probably exceed the duration required, causing the system to drop that frame entirely and expect the next frame instead. If this happens frequently enough, we'll again lose smoothness even that our drawing is fast. However, this is actually improbable with UIKit, as setNeedsDisplay() just marks the view to be re-drawn the next drawing cycle and not immediately.

Enter CADisplayLink

CADisplayLink does just that. From the docs:

A timer object that allows your application to synchronize its drawing to the refresh rate of the display.

To answer our first question, how much do we have to render a frame we can compute that with the following:

let frameDuration = displayLink.targetTimestamp - displayLink.timestamp

To answer our second question, we only have to provide a callback function for the display link where we update our data and then call setNeedsDisplay().

What's only left is how much we should change our data suitable to that time frame.
This depends on your goal, but let's have a simple example.
Assume we want to uniformly animate the stroke of a ring-like shape over 3 seconds.
So, let's have some idealistic assumptions, and do simple maths:

  1. Assume the refresh rate along those whole 3 seconds is constantly 60 FPS each.
  2. Assume all frames have equal durations.

Now, since we agree that each second should have 60 frames, then our 3-second animation should have 3x60 frames = 180 frames.
Therefore, the stroke percentage should increment by 1/180 of 360 degrees.
So, the general formula can be:

current_frame_share = frame_duration / whole_animation_duration
delta = current_frame_share * target_value
current_value += delta

Applying this to our example:

let displayLink = CADisplayLink(target: target, selector: #selector(update))

@objc func update() {
    guard endAngle < TARGET_END_ANGLE else {
        displayLink.invalidate()
        return
    }
    
    let frameDuration = displayLink.targetTimestamp - displayLink.timestamp
    let frameDurationShareOfTotalAnimationTime = frameDuration / ANIMATION_DURATION
    let amountOfRadiansToIncrement = CGFloat(frameDurationShareOfTotalAnimationTime) * TARGET_END_ANGLE
    
    endAngle += amountOfRadiansToIncrement
    setNeedsDisplay()
}

Full code.

Conclusion

As you saw, you're better off going the Core Animation way if you have animation in mind. Also notice that your maths can get rapidly more complex if the animation is not uniform as in our example. That is, if you want to ease-in or ease-out, you'll have to figure how much frames at the start and the end of the animation will have how much changes different to the rest of the frames, and so on for different paces, which is easier with Core Animation with timing functions.

Loading Images out of the Asset Catalog: Part 1

(Originally published 2019-07-12)

Asset Catalog

We use Asset Catalog to store images we use inside our apps. If you're not using it, you should. It's not just a fancy way to organize our resources. It also does some optimizations we happen to overlook them.

However, if you have to not use Asset Catalogs, there are some things you should be aware of. In this part, we are going to investigate the scale property of an image.

@1x, @2x, @3x

The most noticeable feature of asset catalogs is the facility to provide different versions of an image for different screen scales. If we don't use asset catalogs, we are required to put such information in the bundled file's name (e.g. [email protected], [email protected]). If we don't provide such info, a UIImage instance created from such file will have a default scale factor of 1.0.

Good, but what if we have an app that loads images from a folder? We don't want to hard-code image names in our project. We had this use case in one of our apps, and the code to read such images involved enumerating file paths under the given folder URL and creating UIImage instances like this:

for path in paths {
    let image = UIImage(contentsOfFile: path)
}

We also didn't have scale modifiers in the file names. So, every UIImage loaded with a scale factor of 1.0.

What is the implication?

From Apple's docs on the scale property of the UIImage class:

If you multiply the logical size of the image (stored in the size property) by the value in this property, you get the dimensions of the image in pixels.

I'm not so good at English, but I don't think that phrasing is the best. The way it's put makes you think that the pixel size is the variable here. It isn't. The pixel size is fixed. The logical size of the image (what you get via the size property) is the pixel size divided by the scale factor (of the image; not the screen).

Again, what is the implication?

If you have a UIImageView that derives its size from its content, and we want it to always show the full pixel size of its content, ignoring choosing the appropriate scale factor leads to incorrect frame size. For example, if you have an image that is 640x640 pixels. What logical size should a self-sizing UIImageView have in a @2x screen? The answer is 320x320 points. But loading such image without providing a scale factor leads to having an image view with a logical size of 640x640 points. That is, 1280x1280 pixels. That's double of the actual size. Which means that the image is upscaled. Which affects perceived quality, or generally, not the wanted actual pixel size.

So, instead, we should create UIImages using init(data:scale:) like this:

let image = UIImage(data: data, scale: UIScreen.main.scale)

Where data is a Data instance created from a given file path or a URL.

This way we ensure the image appears at its actual pixel size in any device.

Here's an example demonstrating this.

Recommend Projects

  • React photo React

    A declarative, efficient, and flexible JavaScript library for building user interfaces.

  • Vue.js photo Vue.js

    ๐Ÿ–– Vue.js is a progressive, incrementally-adoptable JavaScript framework for building UI on the web.

  • Typescript photo Typescript

    TypeScript is a superset of JavaScript that compiles to clean JavaScript output.

  • TensorFlow photo TensorFlow

    An Open Source Machine Learning Framework for Everyone

  • Django photo Django

    The Web framework for perfectionists with deadlines.

  • D3 photo D3

    Bring data to life with SVG, Canvas and HTML. ๐Ÿ“Š๐Ÿ“ˆ๐ŸŽ‰

Recommend Topics

  • javascript

    JavaScript (JS) is a lightweight interpreted programming language with first-class functions.

  • web

    Some thing interesting about web. New door for the world.

  • server

    A server is a program made to process requests and deliver data to clients.

  • Machine learning

    Machine learning is a way of modeling and interpreting data that allows a piece of software to respond intelligently.

  • Game

    Some thing interesting about game, make everyone happy.

Recommend Org

  • Facebook photo Facebook

    We are working to build community through open source technology. NB: members must have two-factor auth.

  • Microsoft photo Microsoft

    Open source projects and samples from Microsoft.

  • Google photo Google

    Google โค๏ธ Open Source for everyone.

  • D3 photo D3

    Data-Driven Documents codes.