Goal: Learn an advanced rendering technique using the OpenGL pipeline and apply it to make artistic procedural post-processing effects.
The base code for this assignment is extensive, so make sure you spend time simply familiarizing yourself with all of the provided classes and functions. Here is an overview of how the provided code renders its final output:
Each tick(), the provided OpenGLRenderer will perform the following operations:
-
renderToGBuffer: Render the 3D scene (wahoo.obj) into its G-Buffers usingstandard-vert.glslandstandard-frag.glsl. Note that the fragment shader has three outputs rather than just one; this is because it can write to each of the elements ofOpenGLRenderer'sgbTargetsarray. The provided code just writes base albedo to the thirdgbTargetelement. -
renderFromGBuffer: Render the data in its G-Buffers into the first element of itspost32Buffersarray, which stores 32-bit colors rather than 8-bit colors so that the scene can be represented using high dynamic range values. This render pass uses the fragment shaderdeferred-render.glsl, which in the provided base code simply passes the color data from the third G-Buffer into its color output. -
renderPostProcessHDR: Iterate over the collection ofPostProcesses stored inOpenGLRenderer'spost32Passesand apply each one, in sequence, to the image produced in the most recent render pass. The provided base code just uses a singlePostProcessthat appliesexamplePost3-frag.glslto the image, which interpolates the input color between itself and its swizzled BRG value on the right half of the screen, and outputs a value between 0 and 5 for the RBG channels (remember, it's HDR so it's not limited to [0, 1]). Finally, after all general post-processes,renderPostProcessHDRusestonemap-frag.glslto tone map the 32-bit HDR colors of your image down to 8-bit standard LDR colors. -
renderPostProcessLDR: If you've implemented any LDR post-process effects, they will be applied in sequence just like the HDR processes. The base code provided appliesexamplePost-frag.glslandexamplePost2-frag.glslto the image output; the first fades between greyscale and color over time on the left half of the screen and the second renders the red, green, and blue channels of the image individually.
Below is how we suggest you begin working on implementing this assignment. Further below we will outline the requirements for the assignment implementation, so take this list as a general guideline.
-
Look over
standard-vert.glsl, which is implemented for you. This is a fairly standard vertex shader that projects the 3D scene into screen space, and is paired withstandard-frag.glsl. -
Finish
standard-frag.glslby transferring relevant info to G-Buffers. If you want more than three outputs from your 3D render pass, you can increase the size ofOpenGLRenderer'sgbTargets and the size ofstandard-frag.glsl'sfragColoroutput. -
Use the G-Buffer information you output to light and color your scene as you would a forward-rendered scene in
deferred-render.glsl. You may hard-code any light sources you wish. -
Implement tonemapping in
tonemap-frag.glslto map the 32-bit HDR colors of your scene down to 8-bit LDR colors. This will be explained more below. -
Implement three of the post-process effects listed later in this document.
(Optional: comment out the provided post-processing shaders in the constructor for the OpenGLRenderer to make it easier to test your implementation of steps 1-4)
Other notes:
- Make sure to search for the TODO comments for extra notes
- The API does not have to stay the same. If you need to pass arguments from main to post-processes, add the arguments to the respective functions.
- You are not limited to 3 G-Buffers, but you should try to be efficient with them by storing multiple kinds of data in one G-Buffer (e.g. use the W coordinate of the normals texture to store the camera-space depth of the fragment).
At minimum, you should pass the following scene data out from standard-frag.glsl:
- Camera-space depth of the fragment (you'll see why in the next section)
- World-space surface normal of the fragment
- Albedo (base color) of the fragment. This is already done in the base code.
You should use the 32-bit gbTexture (standard-frag.glsl's fragColor[0])
to store both your surface normal and depth value; set its RGB to the surface
normal's XYZ and its W to the depth value. You want a full 32 bits for this data
since you need both precision and the ability to store negative numbers.
Everything else you want to output from this shader can most likely be
represented as a basic 8-bit color using the remaining 8-bit gbTextures.
You may pass additional data if you find it necessary for any of the shading effects you want to implement down the pipeline, just bear in mind that you'll have to increase the number of gbTargets in OpenGLRenderer.
In deferred-render.glsl, take the G-Buffer data you output from the standard shader and implement at minimum:
- Lambertian surface reflection (Blinn-Phong may give you features that are more interesting to work with, though).
- Ambient lighting, so areas that would be very dark are slightly lit.
- Directional or point light illumination by at least one light source.
- An interesting procedural backdrop for your model. For example, this could be a raytraced skybox, or a time-offset noise-based image. You might have an easier time adding this to the scene output if you add a G-Buffer that stores whether or not a pixel is overlapped by a mesh.
In the G-Buffer step above, you only output the camera-space depth of your fragment rather than all three positional coordinates. Part of the reasoning behind this is that we want to use as little memory as possible to store our G-Buffers, so we only made one 32-bit buffer. The other reason is that we can reconstruct the camera-space X and Y of our fragment based on just its screen-space position. Given the UV coordinates of a fragment, map them to [-1, 1] NDC space, then apply the ray casting algorithm found on page 18 of these slides to project the point into camera space (just use default X/Y/Z axes for the right/up/forward vectors instead of the world-space camera vectors).
In tonemap-frag.glsl, implement one of the tone mapping algorithms listed on the Filmic Worlds blog.
As noted above, you must implement three of the effects listed below to receive full credit for this assignment. If you previously took CIS 565, one of the effects you implement must come from the list of artistic styling processes.
If you are unsure exactly how to implement any of these features, you can always come to the course staff for help, but we encourage you to do your own research and find discussions of these techniques online beforehand. You will find yourself doing this fairly often in the "real world" as a programmer, so it's important to develop your searching skills and independence while you're still a student. This isn't CIS 110, so we have no restrictions on you looking up how to implement an algorithm (rather, we encourage it!).
-
Bloom: As a 32-bit HDR effect, find and isolate areas of the image with a value higher than 1, then apply a blur effect and add that to the original image to apply a bloom effect. You may implement any of the blurring effects we've discussed. Since bloom requires storing frame data in two frame buffers at the same time, you will very likely have to modify the provided rendering pipeline to not use a
forloop over the set ofpost32Passes, since this ping-pongs data between two buffers alternately. -
Approximated depth of field: Choose a "focal length" for your virtual camera and compare the camera-space Z coordinate of your fragments to that distance. The farther the Z coordinate is from that length, the stronger a blur effect you should apply to that fragment. We recommend using a Gaussian blur for best visual results, but you are free to implement any blur you want.
-
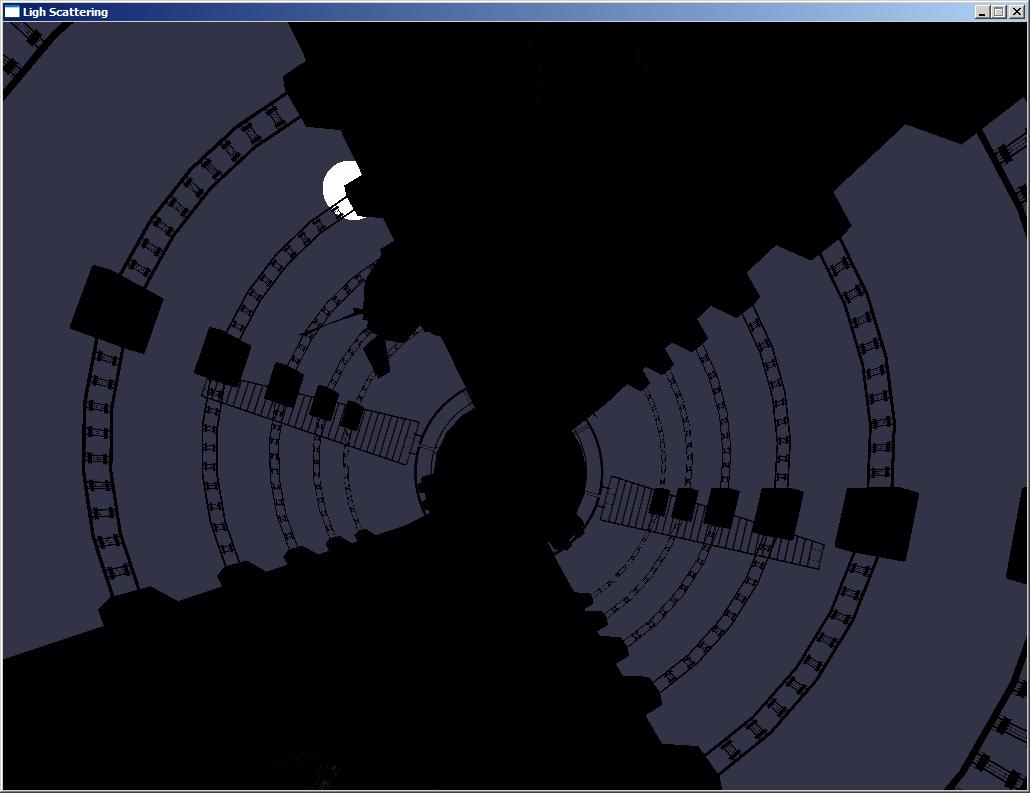
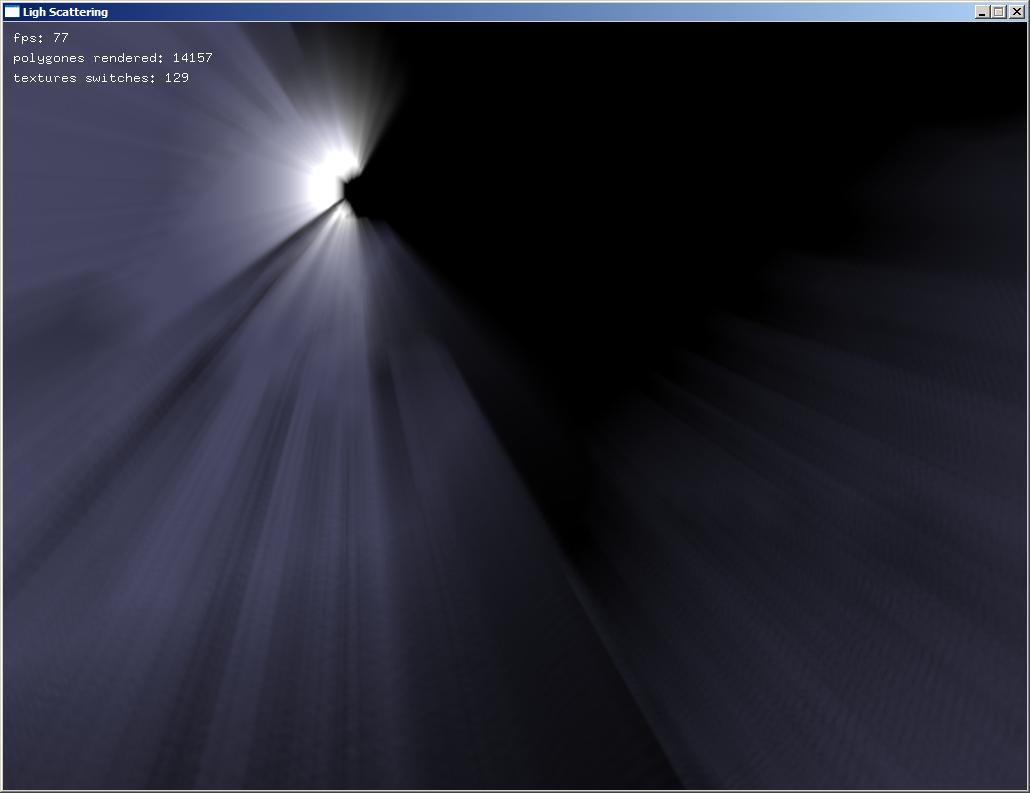
God rays: This effect requires an "occlusion pre-pass" as the input framebuffer. This means rendering all geometry as black ( (0, 0, 0), representing occlusion of light source ) and light source as you normally would, which should yield a framebuffer looking something like this. The godRay shader (different from the occlusion pre-pass shader) then computes a screen-space direction from a given fragment towards the light source(s). Repeatedly sample your image n times, stepping some amount along the light direction, accumulating the sampled color to effectively perform a blur. That should yield something like this. From there, you must blend these blurred rays with the framebuffer containing your actual rendered scene. Additionally, you can find a GPU Gem on this effect here and the linked reference images were taken from here. Also, this technique breaks when the light source is not in view. We don't require you to handle this but you should use blending techniques to smoothly blend in and out of the state where the camera can see the light source.
-
Motion blur: Output some velocity value into a G-Buffer and use it to apply a directional blur to your scene. This will necessitate adding some motion to your 3D scene, even if it's as simple as using sine/cosine curves to move your model around. You should also account for the motion of the camera when you output velocity into your G-Buffer. Consider storing information somewhere about where your model and camera were positioned last frame to compute velocity vectors.
-
Artistic effect: Implement a shader that artistically transforms the scene in some manner. Below is a list of ideas, but you can implement any effect you want provided it's about as complex as the items listed:
- Pointilism with dots of varying size
- Pencil sketch overlay shading
- Oil painting, as seen in The Witcher 3
- Browse through ShaderToy and find something inspirational
- Invent your own! Just make sure you run it by Adam and the TAs first.
- Use Dat.GUI to make some element(s) of your post-processes interactive, even something as simple as being able to activate and deactivate a process. (5 - 15 points)
- Implement an additional feature from the set listed above (15 points)
- FXAA (7 points)
- Shadow mapping (25 points)
- Custom 3D scene with new OBJs and textures (5 - 10 points)
- Screen-space ambient occlusion (30 points)

