Tumblr bot tutorial: Jumpstart Program 2022 edition
Let's make a bot!! These instructions were written for participants in the 2022 Jumpstart Program, but they're publicly viewable for anyone to follow.
Required libraries: pytumblr, random, time, json, csv. Written in Python 3.
For this workshop, you will need to:
- Install Visual Studio Code (VS Code)
- Install the Pytumblr library
- Create a new Tumblr account. (Don't use an existing Tumblr account that has followers, as you're about to make a ton of posts that your followers might not want to clutter their feed.)
Get this code onto your local machine.
-
Fork this repository by clicking the button labeled 'fork' in the top right corner of this window. This will add this repository to your own GitHub account.
-
Clone the repository to your local machine.
- Go to the repository in your account: github.com/(your account name)/bot-tutorial-jumpstart-2022
- Select the green "Code" button and copy the URL there, which should end in .git
- In your terminal [mac] or command line [windows], navigate to your Jumpstart folder which should be located on your desktop:
cd ~/Desktop/jumpstart-2022, and then run the following command to clone the repository to that location:git clone [repository url ending in .git]
- Navigate into that repository with the command
cd jumpstart-bot-tutorial-2022
Give your Tumblr script the passwords it needs to make posts via code instead of using the Tumblr website.
- Go to https://www.tumblr.com/oauth/register and register a new application.
- This name isn't public; call it something like JumpstartBot
- For any urls you need to provide in the registration form, just use the url for your Tumblr that you created when you signed up for your account. (https://(your-blog-name).tumblr.com/)
- Fill out the description field
- Register the Application.
- After you register your Application you should see a list of Applications. Next to the gear there should be a line with
OAuth Consumer Key: [key]. The next line should haveShow secret key Request rate limit removal Explore API. - Click
Show secret key
- Once you've made your app, navigate to in a new tab: https://api.tumblr.com/console/calls/user/info.
- Copy the Oauth Consumer Key and paste in the correct field
- Copy the secret key and paste in correct field
- Submit
- At the top of the page you should see a light blue button that says 'Show Keys'.
-
Copy your keys to credentials.template
-
Save that file as a new file named credentials.py
- (Why save with a new filename? Later on, you'll commit and push the changes you make to these files using Git, and those changes will be publicly viewable on your GitHub account. But you don't want to share your bot account's credentials/passwords. The file called .gitignore has credentials.py listed as a file to ignore, so Git will never even see it, and it won't get sent to your GitHub account.)
This script is a basic Tumblr bot. It will post three things from a list inside the script.
-
Go to the jumpstart-bot-tutorial-2022 folder. Click on
bot1_list-bot.pyto see the code -
To check that you are authenticated and that things are set up correctly to post, you can uncomment line 22 (
print(client_info)) and run the script. Clicking the green "run" triangle will run the script. A Terminal will appear at the bottom of the screen with the output. If you see a lot of output that looks something like this, you are good to go:
{'user': {'name': 'the-programming-librarian', 'likes': 0, 'following': 1, 'default_post_format': 'html', 'blogs': [{'admin': True, 'ask': False, 'ask_anon': False, 'ask_page_title': 'Ask me anything', 'asks_allow_media': True, 'avatar': [{'width': 512, 'height': 512, 'url': 'https://assets.tumblr.com/images/default_avatar/pyramid_open_512.png'}, {'width': 128, 'height': 128, 'url': 'https://assets.tumblr.com/images/default_avatar/pyramid_open_128.png'}, {'width': 96, 'height': 96, 'url': 'https://assets.tumblr.com/images/default_avatar/pyramid_open_96.png'}, {'width': 64, 'height': 64, 'url': 'https://assets.tumblr.com/images/default_avatar/pyramid_open_64.png'}], 'can_chat': False, 'can_send_fan_mail': True, 'can_subscribe': False, 'description': 'A librarian learns how to use the tumblr api to teach a workshop.', 'drafts': 0, 'facebook': 'N', 'facebook_opengraph_enabled': 'N', 'followed': False, 'followers': 0, 'is_blocked_from_primary': False, 'is_nsfw': False, 'likes': 0, 'messages': 0, 'name': 'the-programming-librarian', 'posts': 19, 'primary': True, 'queue': 0, 'share_likes': True, 'subscribed': False, 'theme': {'header_full_width': 3000, 'header_full_height': 1055, 'avatar_shape': 'circle', 'background_color': '#FFFFFF', 'body_font': 'Helvetica Neue', 'header_bounds': '', 'header_image': 'https://64.media.tumblr.com/11e252ac48a565f7f747f091cb11de09/94427a754c2e6e63-ee/s3000x1055/850b010e82fed3882b733c983e7e4b099d1b2134.png', 'header_image_focused': 'https://64.media.tumblr.com/11e252ac48a565f7f747f091cb11de09/94427a754c2e6e63-ee/s2048x3072/e95af88e14211924d0599c93251b19a9f57965e7.png', 'header_image_poster': '', 'header_image_scaled': 'https://64.media.tumblr.com/11e252ac48a565f7f747f091cb11de09/94427a754c2e6e63-ee/s2048x3072/e95af88e14211924d0599c93251b19a9f57965e7.png', 'header_stretch': True, 'link_color': '#00B8FF', 'show_avatar': True, 'show_description': True, 'show_header_image': True, 'show_title': True, 'title_color': '#000000', 'title_font': 'Gibson', 'title_font_weight': 'bold'}, 'title': 'The Programming Librarian', 'total_posts': 19, 'tweet': 'N', 'twitter_enabled': False, 'twitter_send': False, 'type': 'public', 'updated': 1655496858, 'url': 'https://the-programming-librarian.tumblr.com/', 'uuid': 't:0akl_hvuTXSKsf1hVbAu-A'}]}}
-
Take a look at the rest of the script and try to figure out what it's doing. Use the comments (preceded by #) for context.
-
When you are ready to run the bot, uncomment lines 29-38 and run the script again. (Hint: in VSCode you can highlight lines 29-38 and use
CMD(mac)/CTRL(windows)+\to uncomment all the lines). -
Go to your Tumblr to see these posts: https://(your-blog-name).tumblr.com/
Change it up!
- In
post_list, add new things for your bot to post - Increase/decrease time between posts in
time.sleep(5)(5 is the number of seconds)
This script treats the poem This Is Just To Say (by William Carlos Williams) as a mad-lib, filling in 3 blanks from 3 data sources: JSON files from @dariusk's collection of corpora and word lists.
-
Go to the jumpstart-bot-tutorial-2022 folder. Click on
bot2_poem-bot.pyto see the code. -
You can also see the word lists we are drawing from in the data folder. They are
adjectives.json,colors.json, andfruits.json. -
Take a look at the script and try to figure out what it's doing. Use the comments (preceded by #) for context.
-
Clicking the green "run" triangle will run the bot. A Terminal will appear at the bottom of the screen with the output
Change it up!
- Choose different word lists. Check out what else @dariusk https://github.com/dariusk/corpora. Download some you like and add them to the 'data' folder.
- Choose a different piece of text to make into a mad lib.
- Advanced: this script repeats a lot of things, like fetching and processing each .json file. Create a function or two to cut down on repetitive code.
This bot makes a post about a banned book randomly drawn from a spreadsheet of data about banned books. It posts the cover image of the book, the book title, the allged reasons it was challenged and/or banned, as well as the number of years it has spent in the top 10 most frequently challenged/banned books.
-
Go to the jumpstart-bot-tutorial-2022. Click on
bot3_banned-books-bot.py -
Take a ook at
banned-books-data.csvin the data folder as well to see data we are working with. You can also try opening it as an Excel file or spreadsheet to see how it was originally structured. -
Take a look at both files and try to figure out what it's doing. Use the comments (preceded by #) for context.
-
In lines 39-48 -- the lines that actually tell our bot to post to Tumblr -- there are some blanks that you will need to fill in. Hint: use the output from
print(chosen_book)and the blanks that have already been filled to figure out what goes in each. (Hint: look at the README in https://github.com/tumblr/pytumblr for documentation on how to fill out the blanks). -
Select
Run
Change it up!
- Is there additional context you would like to add to each post? Additional data you would like to provide about each of these books? Change up the csv file provided or the information you feed into the post!
- Try making a bot that uses data from a different spreadsheet. You can export something you might already have as a .csv file and go from there.
This script makes five posts from the first five lines of an external .txt file, data/phrases_coined_by_shakespeare.txt
-
Go to the jumpstart-bot-tutorial-2022 folder. Click on
bonusbot1_text-bot.py -
Also look at
phrases_coined_by_shakespeare.txtin the data folder to see the text we are using. -
Take a look at both files and try to figure out what it's doing. Use the comments (preceded by #) for context.
-
Select
Run
Change it up!
- Make the bot make more or fewer posts, or change which lines, by editing the numbers in
for line in tweettext[0:5].[0:5]means from the first thing up to (but not including) the #5 thing. Programming languages consider 0 to be the first number, so what we'd call "line one" is actually "line zero" to the computer, and "line six" to humans is "line five" to the computer.
- Make a new .txt file for the bot to post from. For example, pick a book or poem from gutenberg.org. Then, in textbot.py, replace
data/phrases_coined_by_shakespeare.txtwith thedata/newfilename.txt
This script mixes up talk titles from ALA Annual Conferences 2016–2021. First, it takes a list of talks and splits those titles into potential beginnings and endings. Then, it chooses a random beginning and a random ending, smushes them together into a new talk title, and posts it. This script also introduces a function, splitTitle(), and demonstrates how to choose a random item in a list using Python's random library.
Change it up!
- In the post (
post_texton line ~70), add a bit of text that comes before the new talk title, like "Your new ALA session is..." - Use another .txt file instead of
data/ala_all-talk-titles.txt. Use one you have on your computer, or make a new .txt file with movie names or book titles. - Make a longer title. Above line ~67, add a
title_middle_partthat picks another random line frombeginnersorenders(up to you). - Advanced: Use the splitTitles() function on two different .txt files. Mash together a random item from the first .txt file with a random item from the second .txt file.
- Very advanced: Some parts of this code are repetitive. Use a
forloop in the part of the script that picks a random item frombeginnersandendersand stitches it together, lines ~61-70. Or you could make a new function. - Very advanced: In the
splitTitles()function, split titles into thirds instead of halves (starting at line ~38). Make another list calledmiddle_list(involves some math and finagling to replacemidpoint.) Then find a way to pick a random item from your list of middle parts, and work that into your post.
You've made changes to these scripts since you first forked them. Now you'll practice committing and pushing those changes so you have a record of your versions.
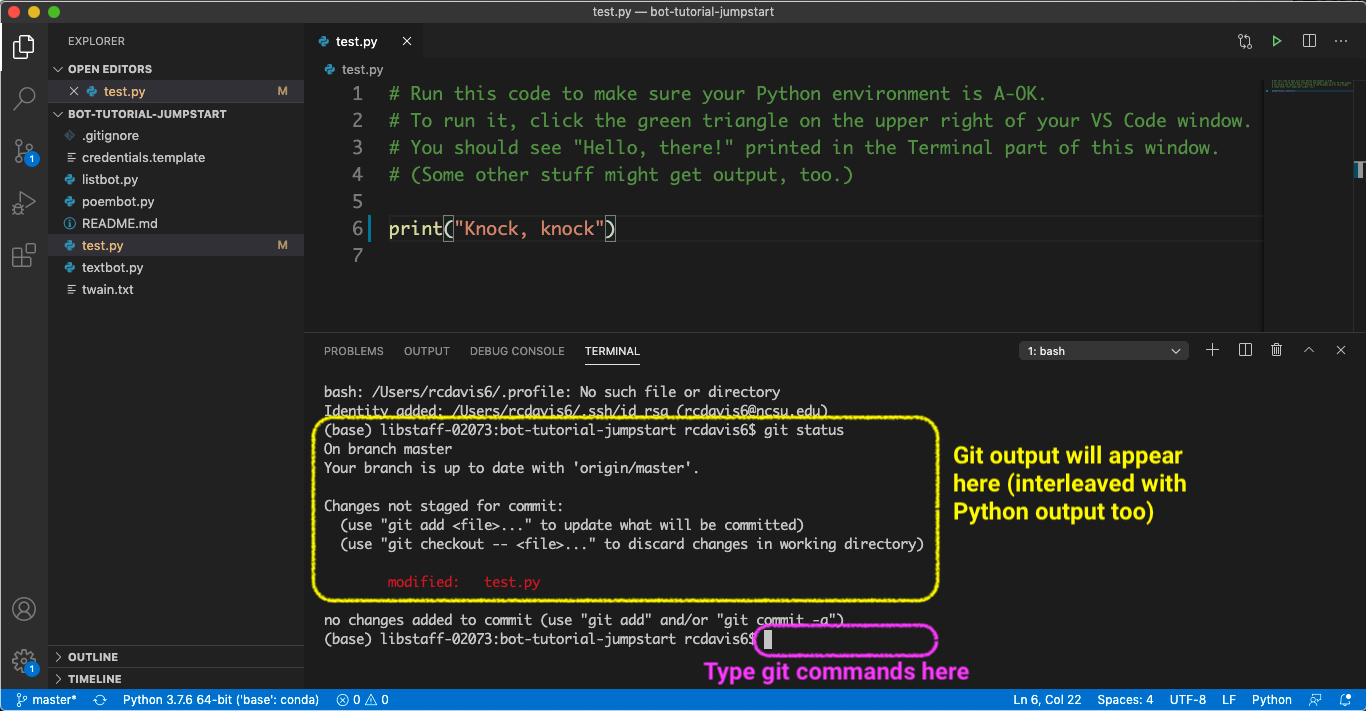
View an annotated screenshot of how/where to use Git in VS Code
In the Terminal window of VS Code, type these lines, hitting return after each one:
git add .git commit -m "My bot updates"git push origin main
You should see a message of success.
This tutorial and its updated materials were originally put together by Robin Davis (@robincamille) and Mark Eaton (github.com/MarkEEaton) for a pre-conference workshop at Code4Lib 2018. Tori Culler and Robin Davis adapted this workshop for the Library Technology Career Jumpstart Program in 2020 & 2021. Tori Culler has further updated it for Jumpstart 2022, adding the banned books bot.
See original repo: https://github.com/robincamille/bot-tutorial
See also: Davis, Robin, and Mark Eaton. Make a Twitter Bot in Python: Iterative Code Examples. Journal of Interactive Technology and Pedagogy (Blueprints section). April 2016. (Verbose write-up featuring code from a previous version of this workshop.)

